---
title: "分布式事务:从理论到实践(二)"
description: "分布式事务:从理论到实践(二)前文 分布式事务:从理论到实践(一)我们提到了Seata的AT和TCC模式,本"
date: 2020-10-29T04:47:17Z
canonical: https://xiaobox.github.io/p/2020-10-29-fen-bu-shi-shi-wu-cong-li-lun-dao-shi-jian-er/
author: 小盒子
categories: ["云原生"]
tags: ["Spring", "Redis", "Nacos", "Docker", "网络"]
source: https://mp.weixin.qq.com/s/n6riUjzUqi2EtAVO1gjtIQ
license: CC BY-NC-SA 4.0
license_url: https://creativecommons.org/licenses/by-nc-sa/4.0/
---
# 分布式事务:从理论到实践(二)
# 分布式事务:从理论到实践(二)
前文 [分布式事务:从理论到实践(一)](http://mp.weixin.qq.com/s?__biz=MzI3Njk5ODg4OQ==&mid=2247484799&idx=1&sn=5be388a7fe885ce4dd26b921a3f86ebe&chksm=eb6dbaf9dc1a33ef372547b3d9f817508e01f7e3d033a58dde3cd155ad3ed26feea637f4daa9&scene=21#wechat_redirect)我们提到了Seata的AT和TCC模式,本文中我们针对这两个模式进行深入分析和开发实践。
## AT 模式
### 原理回顾
根据 官方文档[1] 及提供的 博客[2] 我们先回顾一下AT模式下分布式事务的原理
AT 模式的一阶段、二阶段提交和回滚均由 Seata 框架自动生成,用户只需编写“业务 SQL”,便能轻松接入分布式事务,AT 模式是一种对业务无任何侵入的分布式事务解决方案。
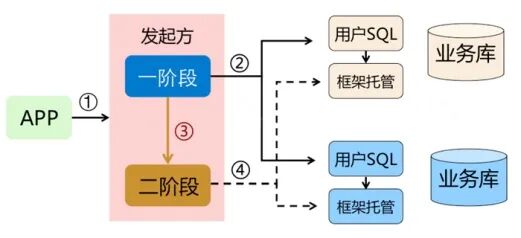
- 一阶段:在一阶段,Seata 会拦截“业务 SQL”,首先解析 SQL 语义,找到“业务 SQL”要更新的业务数据,在业务数据被更新前,将其保存成“before image”,然后执行“业务 SQL”更新业务数据,在业务数据更新之后,再将其保存成“after image”,最后生成行锁。以上操作全部在一个数据库事务内完成,这样保证了一阶段操作的原子性。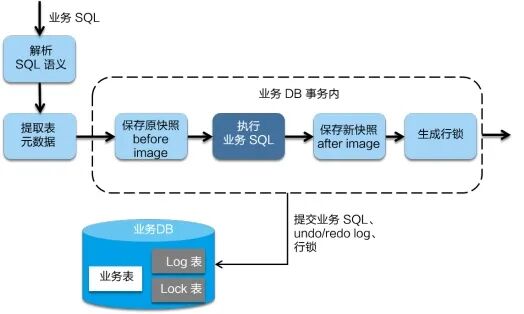
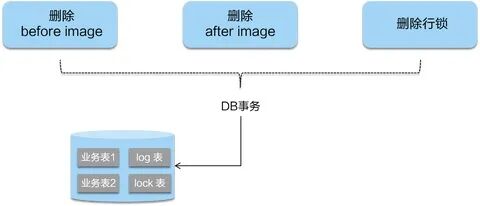
- 二阶段提交:二阶段如果是提交的话,因为“业务 SQL”在一阶段已经提交至数据库, 所以 Seata 框架只需将一阶段保存的快照数据和行锁删掉,完成数据清理即可。
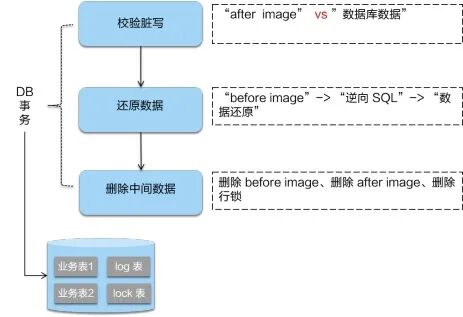
- 二阶段回滚:二阶段如果是回滚的话,Seata 就需要回滚一阶段已经执行的“业务 SQL”,还原业务数据。回滚方式便是用“before image”还原业务数据;但在还原前要首先要校验脏写,对比“数据库当前业务数据”和 “after image”,如果两份数据完全一致就说明没有脏写,可以还原业务数据,如果不一致就说明有脏写,出现脏写就需要转人工处理。
### 环境搭建
本文demo使用的环境是基于
- SpringBoot
- Spring Cloud Alibaba
- Nacos
- Apollo
- docker compose
首先将 seata-server 在服务器搭建起来,由于我们使用 nacos作为seata的注册中心、apollo为注册中心,所以先将这两个组件搭建起来,具体的安装方法请分别参考各自的官方文档。nacos[3] apollo[4]
nacos 和 apollo 搭起来以后,我们开始搭建 seata-server 以下是 docker-compose 的配置:
```yaml
version: "3.1"
services:
seata-server:
image: seataio/seata-server:latest
hostname: seata-server
ports:
- 8091:8091
environment:
- SEATA_PORT=8091
- SEATA_IP={你的IP}
- SEATA_CONFIG_NAME=file:/seata-server/resources/registry
volumes:
- ./seata/registry.conf:/seata-server/resources/registry.conf
expose:
- 8091
```
修改 registry.conf 配置文件,由于我们使用 nacos 作为注册中心,apollo 作为配置中心,所以需要修改到以下配置:
```
registry {
# file 、nacos 、eureka、redis、zk、consul、etcd3、sofa
type = "nacos"
loadBalance = "RandomLoadBalance"
loadBalanceVirtualNodes = 10
nacos {
application = "seata-server"
serverAddr = "你的IP:端口"
group = "SEATA_GROUP"
namespace = ""
cluster = "default"
username = ""
password = ""
}
}
config {
# file、nacos 、apollo、zk、consul、etcd3
type = "apollo"
apollo {
appId = "seata-server"
apolloMeta = "http://你的IP:端口"
namespace = "application"
env= "dev"
apolloAccesskeySecret = ""
}
}
```
注意:seata-server 是可以配置数据库存储 seata 所用数据的,我们为了方便利用本地 file 的方式存储数据,所以没有再做数据库的配置。如需修改可以修改配置文件 file.conf
下面是 file.conf 的默认配置:
```
store {
## store mode: file、db、redis
mode = "file"
## file store property
file {
## store location dir
dir = "sessionStore"
# branch session size , if exceeded first try compress lockkey, still exceeded throws exceptions
maxBranchSessionSize = 16384
# globe session size , if exceeded throws exceptions
maxGlobalSessionSize = 512
# file buffer size , if exceeded allocate new buffer
fileWriteBufferCacheSize = 16384
# when recover batch read size
sessionReloadReadSize = 100
# async, sync
flushDiskMode = async
}
## database store property
db {
## the implement of javax.sql.DataSource, such as DruidDataSource(druid)/BasicDataSource(dbcp)/HikariDataSource(hikari) etc.
datasource = "druid"
## mysql/oracle/postgresql/h2/oceanbase etc.
dbType = "mysql"
driverClassName = "com.mysql.jdbc.Driver"
url = "jdbc:mysql://127.0.0.1:3306/seata"
user = "mysql"
password = "mysql"
minConn = 5
maxConn = 100
globalTable = "global_table"
branchTable = "branch_table"
lockTable = "lock_table"
queryLimit = 100
maxWait = 5000
}
## redis store property
redis {
host = "127.0.0.1"
port = "6379"
password = ""
database = "0"
minConn = 1
maxConn = 10
maxTotal = 100
queryLimit = 100
}
}
```
启动 nacos、apollo、seata-server
当显示以下信息时,代表seata-server启动了。
这时我们查看 nacos ,也注册上了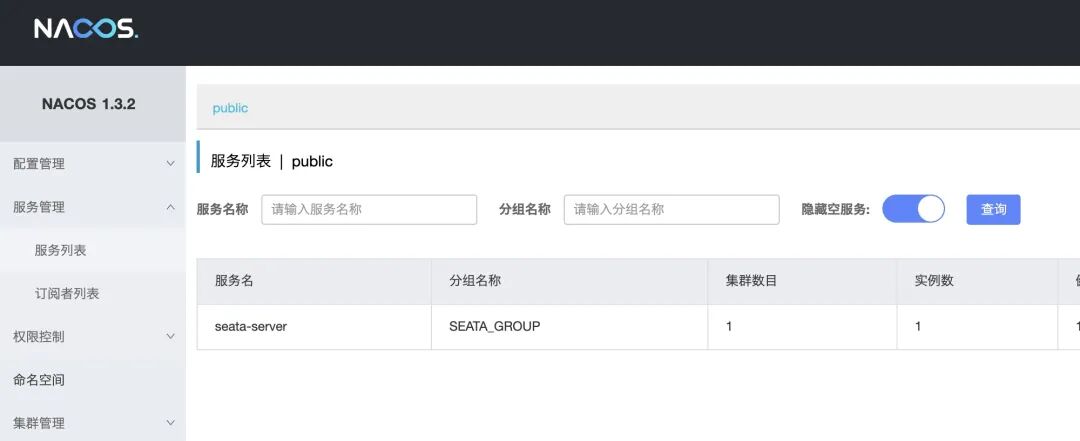
apollo 中我们添加一个名为 `service.vgroup-mapping.demo-service-seata`的key ,value为 `default`,至于这个的作用,我们后面再说。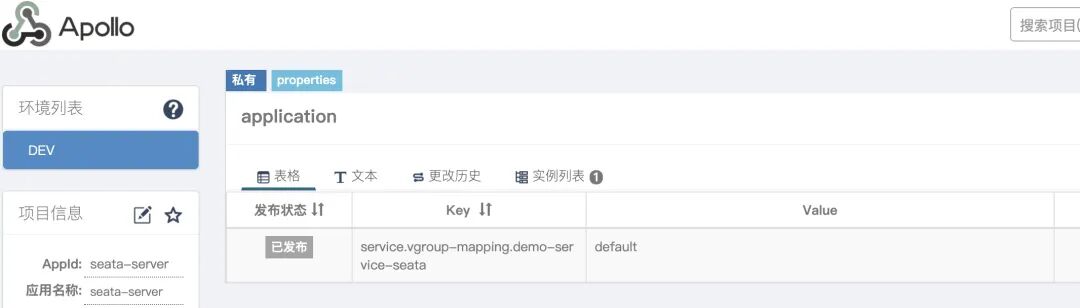
我们的 demo 中包含三个服务
- demo-order
- demo-storage
- demo-user
服务间调用使用的是Spring Cloud OpenFeign,除了 SpringBoot 和Spring Cloud 等基础 bom 要依赖外,还需要加入 seata 的依赖,我的pom,大致如下:
```html
2.3.2.RELEASE
Hoxton.SR8
2.2.3.RELEASE
org.springframework.boot
spring-boot-starter-parent
${spring-boot-dependencies.version}
pom
import
org.springframework.cloud
spring-cloud-dependencies
${spring-cloud-dependencies.version}
pom
import
com.alibaba.cloud
spring-cloud-alibaba-dependencies
${spring-cloud-alibaba-dependencies.version}
pom
import
org.springframework.boot
spring-boot-starter-web
io.seata
seata-spring-boot-starter
com.alibaba.cloud
spring-cloud-starter-alibaba-seata
com.alibaba.cloud
spring-cloud-starter-alibaba-nacos-discovery
org.springframework.cloud
spring-cloud-starter-openfeign
```
至于项目中所用ORM框架,数据库连接池等就因人而异了,我用的是mybatis-plus和hikari,数据库用的是 mysql5.7。
针对上面的三个服务分别创建三个数据库,order、user、storage,并在每个库中分别创建一个业务表 t\_order、t\_user、t\_storage 这里就不贴建库表的脚本了,大家可以按照自己的设计自己建,需要注意的是每个库都需要再创建一个 undo\_log 表,这是为seata做分布式事务回滚所用。
```sql
CREATE TABLE `undo_log` (
`id` bigint(20) NOT NULL AUTO_INCREMENT,
`branch_id` bigint(20) NOT NULL,
`xid` varchar(100) NOT NULL,
`context` varchar(128) NOT NULL,
`rollback_info` longblob NOT NULL,
`log_status` int(11) NOT NULL,
`log_created` datetime NOT NULL,
`log_modified` datetime NOT NULL,
PRIMARY KEY (`id`),
UNIQUE KEY `ux_undo_log` (`xid`,`branch_id`)
) ENGINE=InnoDB AUTO_INCREMENT=1 DEFAULT CHARSET=utf8;
```
每个服务中 application.yml 中对应 seata 的配置如下
```yaml
spring:
profiles:
active: dev
cloud:
nacos:
discovery:
namespace: public
password: nacos
server-addr: IP:PORT
networkInterface: eth1
username: nacos
# Seata 配置项,对应 SeataProperties 类
seata:
application-id: ${spring.application.name} # Seata 应用编号,默认为 ${spring.application.name}
tx-service-group: demo-service-seata # Seata 事务组编号,用于 TC 集群名
# Seata 服务配置项,对应 ServiceProperties 类
service:
# 虚拟组和分组的映射
vgroup-mapping:
demo-service-seata: default
# Seata 注册中心配置项,对应 RegistryProperties 类
registry:
type: nacos # 注册中心类型,默认为 file
nacos:
cluster: default # 使用的 Seata 分组
namespace: # Nacos 命名空间
serverAddr: 你的IP:端口 # Nacos 服务地址
```
这里有几点需要注意:
- `demo-service-seata` 出现了两次,这两个地方要写成一样
- `demo-service-seata: default`
- 与我们在 apollo 中配置的要一样
- 与 seata-server registry.conf 中 nacos 的 cluster 配置一样。
- nacos 配置 `networkInterface: eth1`
- 这样写是因为服务部署在服务器后用的内网IP注册到了nacos,想配置它用外网地址就改了下走特定网卡。
- 解决方案参考:这里[5]例如,使用了Spring cloud alibaba(官方文档)作为Nacos客户端,服务默认获取了内网IP 192.168.1.21,可以通过配置 spring.cloud.inetutils.preferred-networks=10.34.12,使服务获取内网中前缀为10.34.12的IP
- 在老版本的 seata 是需要手动设置 DataSourceProxy的 ,参考 官网文档[6] 新版本的默认是自动代理的,不需要再写了。
至此我们的环境搭建和准备工作就结束了。
### 分布式事务具体代码
我们设计这样一个同步的业务流程,创建订单前先扣减库存,再扣减账户余额,然后再创建订单,demo设计上参考了 芋道源码[7]。大致流程如下图: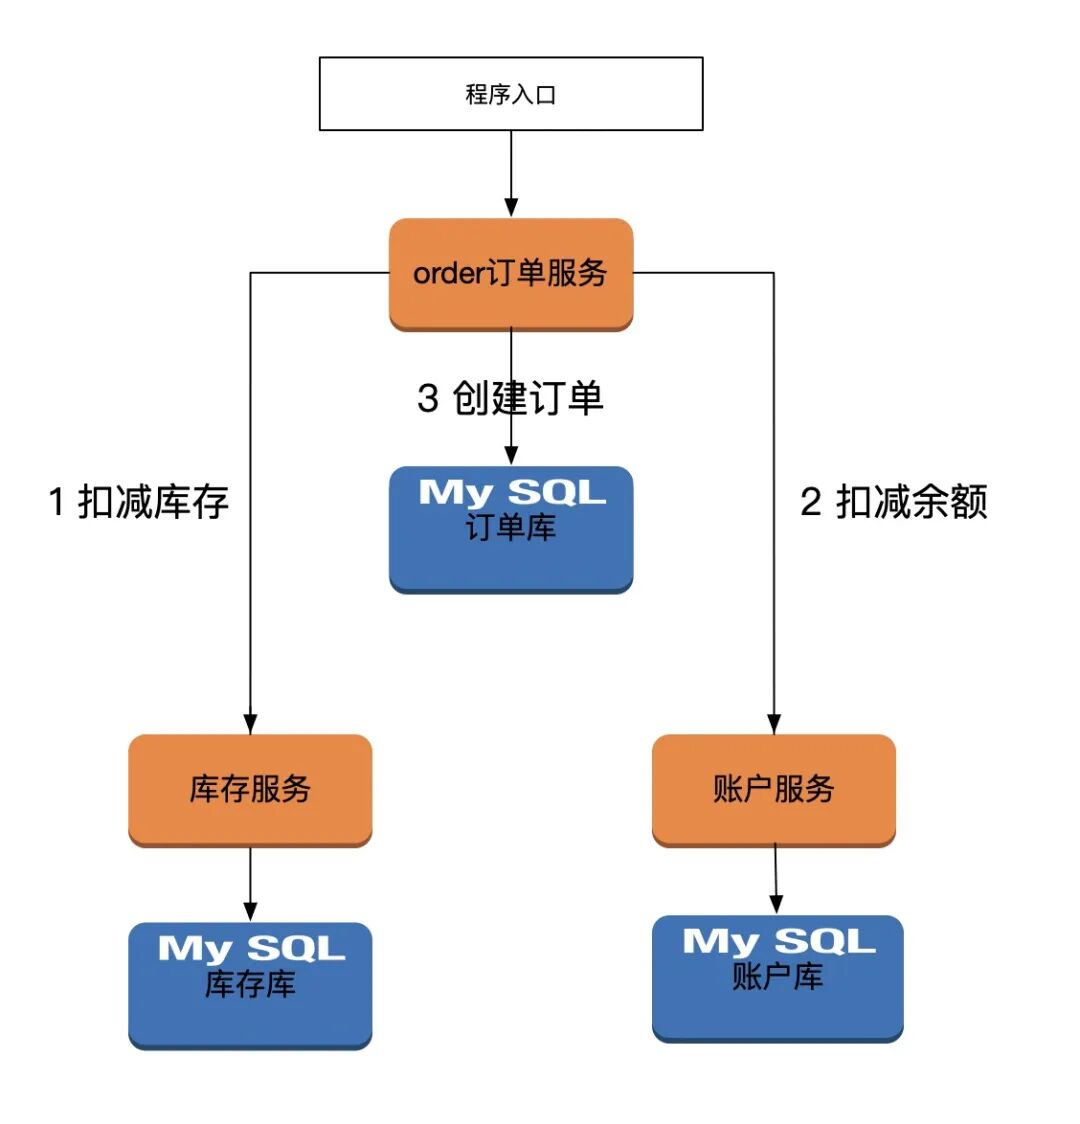
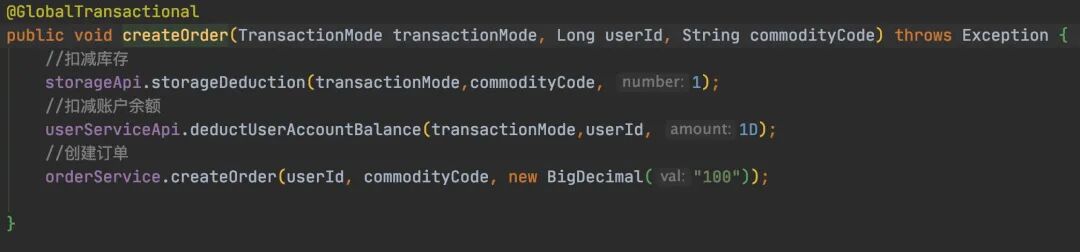通过入口进入orderServicer后,进行上面的三步流程,分别调用两个微服务,再调自己的订单服务,这里注意两点:
- 分布式全局事务入口,要添加 @GlobalTransactional
- 要抛出异常
接下来是扣减库存微服务部分,简单做了下扣减,小于10抛出异常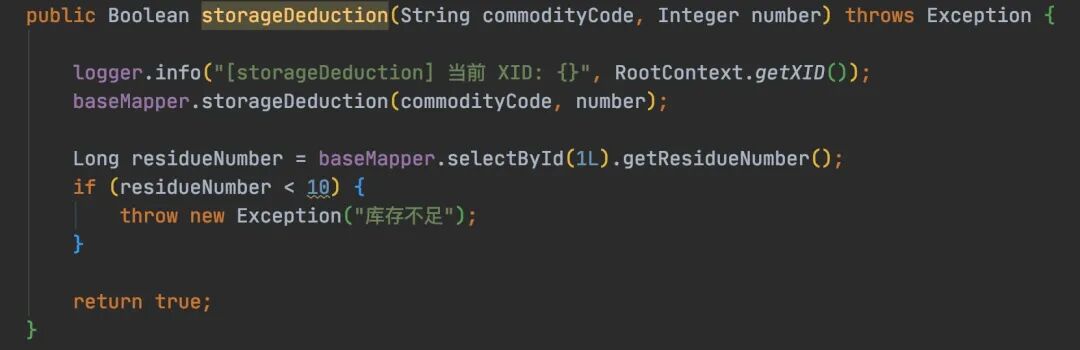
然后是账户微服务部分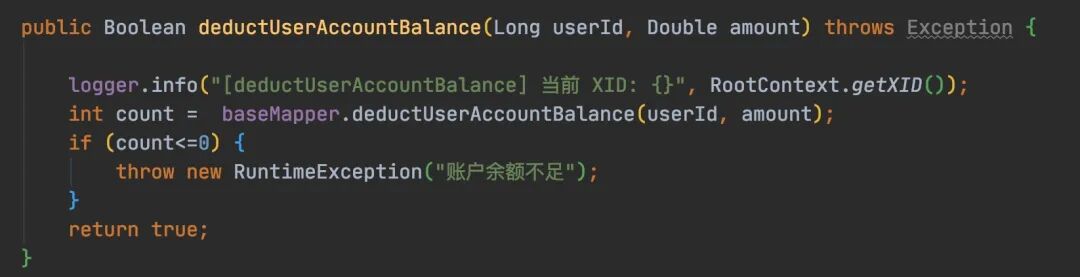
最后是订单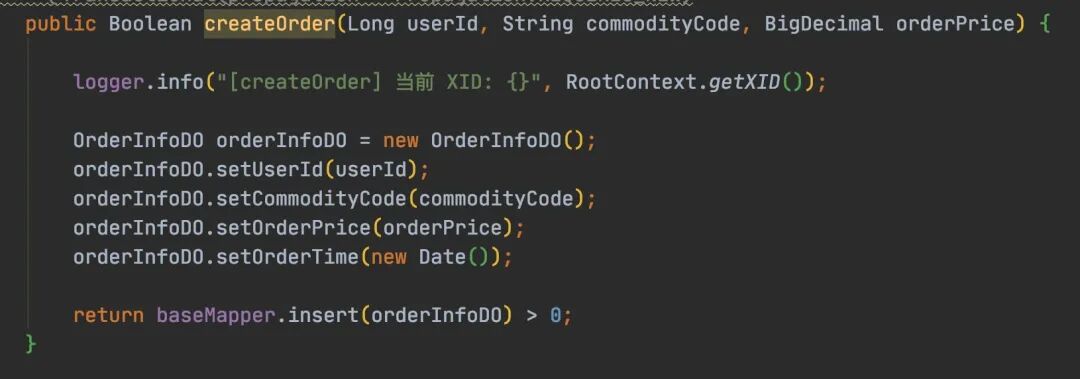
代码都比较简单,有几个点需要注意下
- 全局事务的隔离性和本地事务的不是一个概念。
- 全局事务的隔离级别一定基础上依赖本地事务的隔离级别。因此本地事务的隔离级别只要大于等于seata支持的隔离级别就行,所以一般数据库的默认级别就可以
- seata的全局事务注解是@GlobalTransactional,@Transactional 是spring的注解,解决本地事务问题,属于两种不同粒度的事务范畴。
- 如果要加全局事务就一定要用 @GlobalTransactional。
- 在一个事务方法上,是可以叠加两个注解的,仅意味着功能的叠加,即:有本地事务的处理,也有全局事务的加持。两者不冲突。
由于在数据库本地事务隔离级别 读已提交(Read Committed) 或以上的基础上,Seata(AT 模式)的默认全局隔离级别是 读未提交(Read Uncommitted) 。
所以这种隔离性会带来问题(注意这里说的是全局事务):
- 脏读:一个事务读取到另一个事务未提交的数据 解决方案:
- @GlobalLock+@Transactional 注解 + select语句加for update 或
- GlobalTransactional注解+select语句加for update
- 脏写:一个事务提交的数据覆盖了另一个事务未提交的数据 解决方案:必须使用@GlobalTransaction
其实上面这部分,官方文档也写的很清楚,尤其对于隔离性的解析: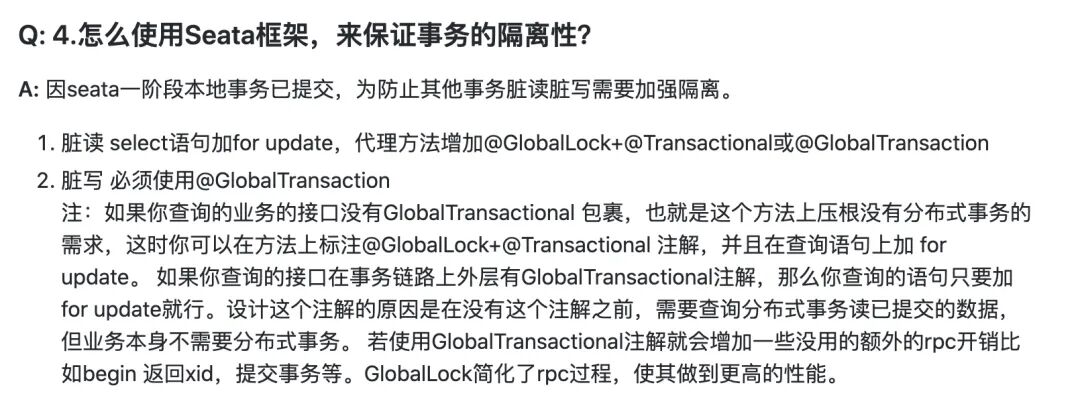
上图有些地方理解起来要注意:
- 这里说的事务指的是全局的分布式事务,别想成本地事务了,
- 关于@GlobalLock,场景是一个是全局分布式事务,另一个不是分布式事务,如果你想让分布式事务不产生“脏读”,那么可以在另一个非分布式事务上加@GlobalLock。
我的测试中事务的正常执行和回滚都没有问题,如果你观察各数据库的 undo\_log 表,可能会发现没有数据,但实际情况是数据是插入后又很快清除了,所以你没看到,如果你观察主键的 auto\_increment 可以看到一直在增长。由于我用了阿里云的RDS,可以通过SQL洞察看到SQL的执行历史,这里看到sql确实执行过。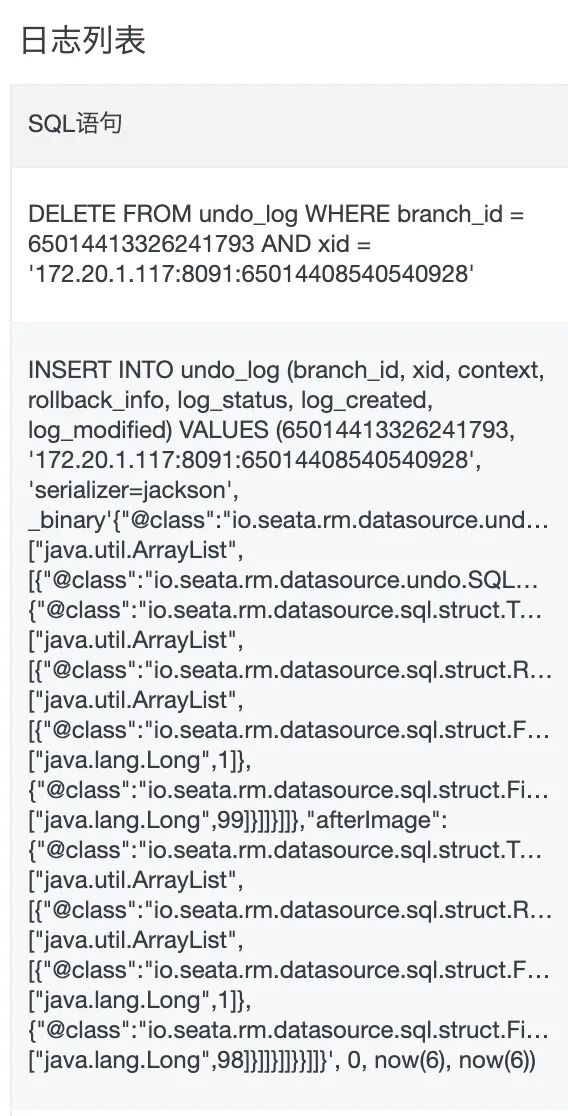
XID是全局事务ID,有时候我们需要获得并进行一些操作,那么可以这样做
```
String xid = RootContext.getXID();
RootContext.unbind();//解绑
//中途做一些与事务无关的事。比如日志服务等等 排除掉,然后
RootContext.bind(xid);//再绑回来
```
@GlobalTransactional也有自己的隔离级别和rollback等,可根据业务情况自行设置
```java
package io.seata.spring.annotation;
import io.seata.tm.api.transaction.Propagation;
import java.lang.annotation.ElementType;
import java.lang.annotation.Inherited;
import java.lang.annotation.Retention;
import java.lang.annotation.RetentionPolicy;
import java.lang.annotation.Target;
@Retention(RetentionPolicy.RUNTIME)
@Target({ElementType.METHOD, ElementType.TYPE})
@Inherited
public @interface GlobalTransactional {
int timeoutMills() default 60000;
String name() default "";
Class[] rollbackFor() default {};
String[] rollbackForClassName() default {};
Class[] noRollbackFor() default {};
String[] noRollbackForClassName() default {};
Propagation propagation() default Propagation.REQUIRED;
}
```
### AT 总结
- 再次强调AT模式是自动的,它自动帮你做回滚和提交,使用时考虑跟自己的实际业务场景是否适合。
- 例子中我对执行事务的方法并没有做幂等,在实际生产情况下,一定会出现问题的,所以大家在用的时候要注意做接口幂等处理。
- 有关更多seata的参数配置,如超时,重试次数等。请参考 官网[8] 。这里当然要结合你的feign的重试和超时时间整体考虑。
- 通过上文的描述我们利用一个例子将AT模式的全局分布式事务模拟了出来,也总结了一些比较难理解和需要注意的点,希望能够帮助到正在使用seata的小伙伴。
### 参考资料
[1]
seata官方文档: *http://seata.io/zh-cn/docs/overview/what-is-seata.html*
[2]
分布式事务 Seata 及其三种模式详解: *http://seata.io/zh-cn/blog/seata-at-tcc-saga.html*
[3]
nacos官方文档: *https://nacos.io/zh-cn/*
[4]
apollo的github地址: *https://github.com/ctripcorp/apollo*
[5]
解决nacos注册内网地址问题: *https://www.cnblogs.com/liboware/p/11973321.html*
[6]
官网文档: *http://seata.io/zh-cn/docs/user/configurations.html*
[7]
芋道源码: *http://www.iocoder.cn/Spring-Cloud-Alibaba/Seata/*
[8]
官网参数配置: *http://seata.io/zh-cn/docs/user/configurations.html*

关注公众号 获取更多精彩内容