上一篇我们用 ShardingSphere-Proxy实现了读写分离
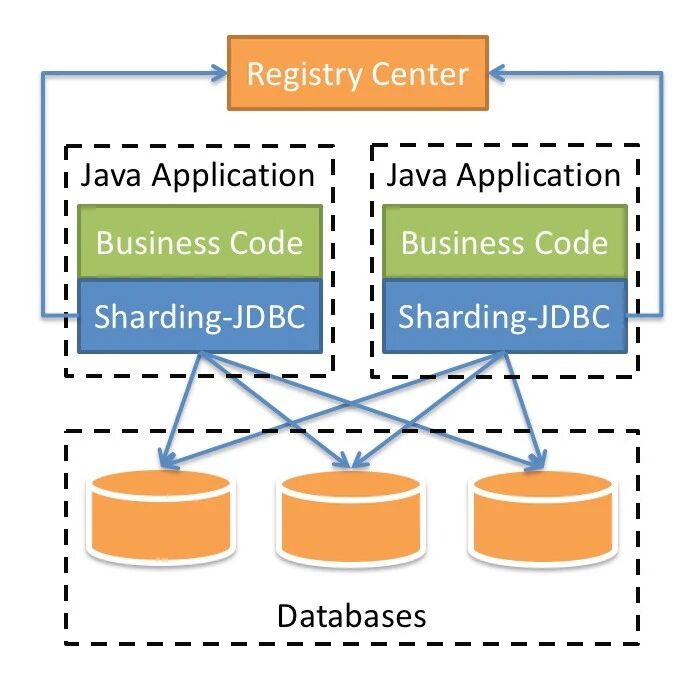
这一次我们用 ShardingSphere-JDBC 来实现一下
引入依赖
我本地用的是 springboot 2 的版本,引用的 ShardingSphere-JDBC 的5.0.0-beta 版本
1 <dependency>
2    <groupId>org.apache.shardingsphere</groupId>
3    <artifactId>shardingsphere-jdbc-core-spring-boot-starter</artifactId>
4    <version>5.0.0-beta</version>
5</dependency>
修改配置文件
 1spring:
 2  profiles:
 3    include: common-local
 4  shardingsphere:
 5    datasource:
 6      names: write-ds,read-ds-0
 7      write-ds:
 8        jdbcUrl: jdbc:mysql://mysql.local.test.myapp.com:23306/test?allowPublicKeyRetrieval=true&useSSL=false&allowMultiQueries=true&serverTimezone=Asia/Shanghai&useSSL=false&autoReconnect=true&useUnicode=true&characterEncoding=utf-8&zeroDateTimeBehavior=convertToNull
 9        type: com.zaxxer.hikari.HikariDataSource
10        driver-class-name: com.mysql.cj.jdbc.Driver
11        username: root
12        password: nicai
13        connectionTimeoutMilliseconds: 3000
14        idleTimeoutMilliseconds: 60000
15        maxLifetimeMilliseconds: 1800000
16        maxPoolSize: 50
17        minPoolSize: 1
18        maintenanceIntervalMilliseconds: 30000
19      read-ds-0:
20        jdbcUrl: jdbc:mysql://mysql.local.test.read1.myall.com:23306/test?allowPublicKeyRetrieval=true&useSSL=false&allowMultiQueries=true&serverTimezone=Asia/Shanghai&useSSL=false&autoReconnect=true&useUnicode=true&characterEncoding=utf-8&zeroDateTimeBehavior=convertToNull
21        type: com.zaxxer.hikari.HikariDataSource
22        driver-class-name: com.mysql.cj.jdbc.Driver
23        username: root
24        password: nicai
25        connectionTimeoutMilliseconds: 3000
26        idleTimeoutMilliseconds: 60000
27        maxLifetimeMilliseconds: 1800000
28        maxPoolSize: 50
29        minPoolSize: 1
30        maintenanceIntervalMilliseconds: 30000
31
32    rules:
33      readwrite-splitting:
34        data-sources:
35          glapp:
36            write-data-source-name: write-ds
37            read-data-source-names:
38              - read-ds-0
39            load-balancer-name: roundRobin # 负载均衡算法名称
40        load-balancers:
41          roundRobin:
42            type: ROUND_ROBIN # 一共两种一种是 RANDOM(随机),一种是 ROUND_ROBIN(轮询)
这里主要根据官网的 property 配置文件转的 yaml 文件,需要注意几点:
- type: com.zaxxer.hikari.HikariDataSource 我用的是 Hikari 连接池,根据你的实际情况来
- driver-class-name: com.mysql.cj.jdbc.Driver 不同 mysql 版本不一样,根据你的实际情况来,我的是 mysql 8.0
- jdbcUrl ,官网上写的是 url, 不对,要写成 jdbcUrl
遇到的问题
 1Description:
 2
 3Configuration property name 'spring.shardingsphere.datasource.write_ds' is not valid:
 4
 5    Invalid characters: '_'
 6    Bean: org.apache.shardingsphere.spring.boot.ShardingSphereAutoConfiguration
 7    Reason: Canonical names should be kebab-case ('-' separated), lowercase alpha-numeric characters and must start with a letter
 8
 9Action:
10
11Modify 'spring.shardingsphere.datasource.write_ds' so that it conforms to the canonical names requirements.
之前把配置文件中的某些名字配置用下划线写了,不行,得用中线。
测试
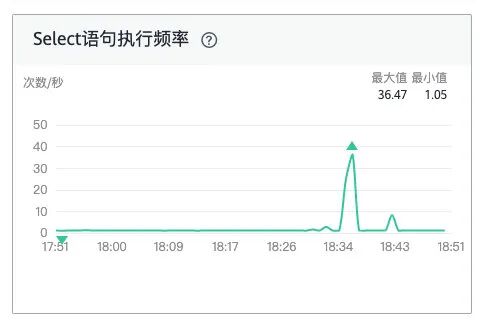
所有的改动只有以上这么多,还是比较简单的,以下的读库请求打过来时的监控,证明读请求都过来了,写库没有。
这是写库的: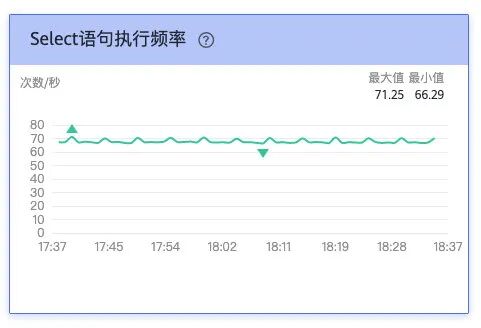
这是读库的: