
前言
通过前面两篇中的应用例子,我们已经大概知道 RocketMQ 的架构是什么样的了。如图:
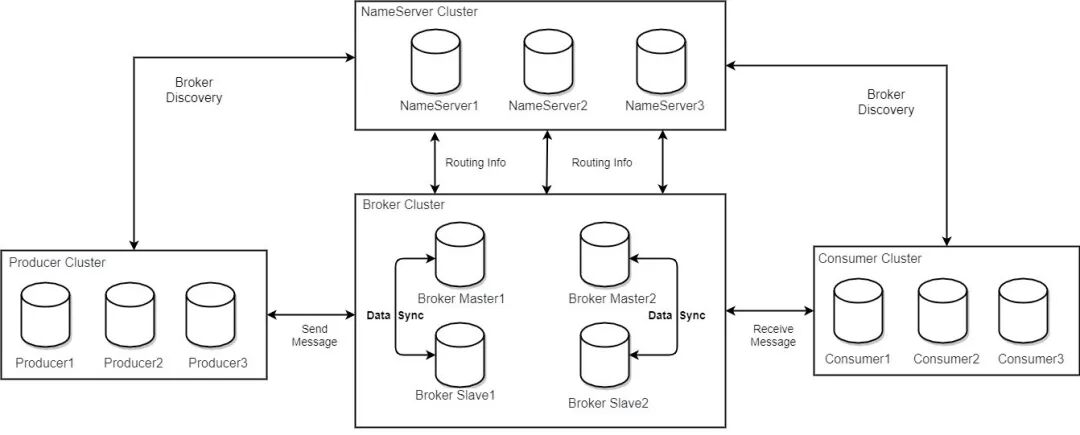
主要是以下几个部分:
- producer
- consumer
- broker
- nameserver
如果你自己动手部署过 RocketMQ, 相信对下面的这个部署架构图会非常清楚:
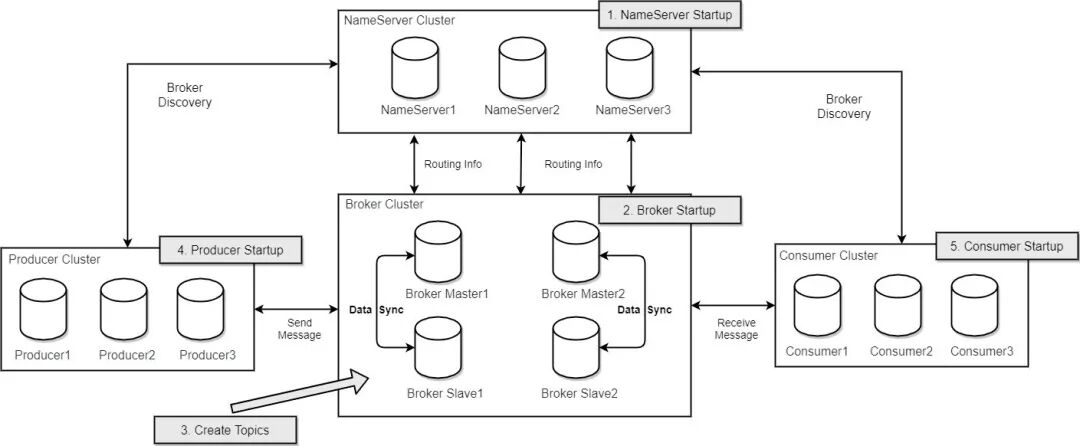
本文我们来了解一下 RockerMQ 中的消息存储是如何设计和实现的。
消息存储
前知识
在介绍之前我们先了解几个基本概念:
分区
消息队列中 同一个 topic 中的消息可能会存储到多个分区上,如下图:
offset
消息在 broker 上的每个分区都是组织成一个文件列表,消费者拉取数据需要知道数据在文件中的偏移量,这个偏移量就是所谓 offset。Offset 是绝对偏移量,服务器会将 offset 转化为具体文件的相对偏移量 , 消费者消费消息队列的偏移量 , 通过 offset 找到 message
存储架构
消息存储是 RocketMQ 中最为复杂和最为重要的一部分。
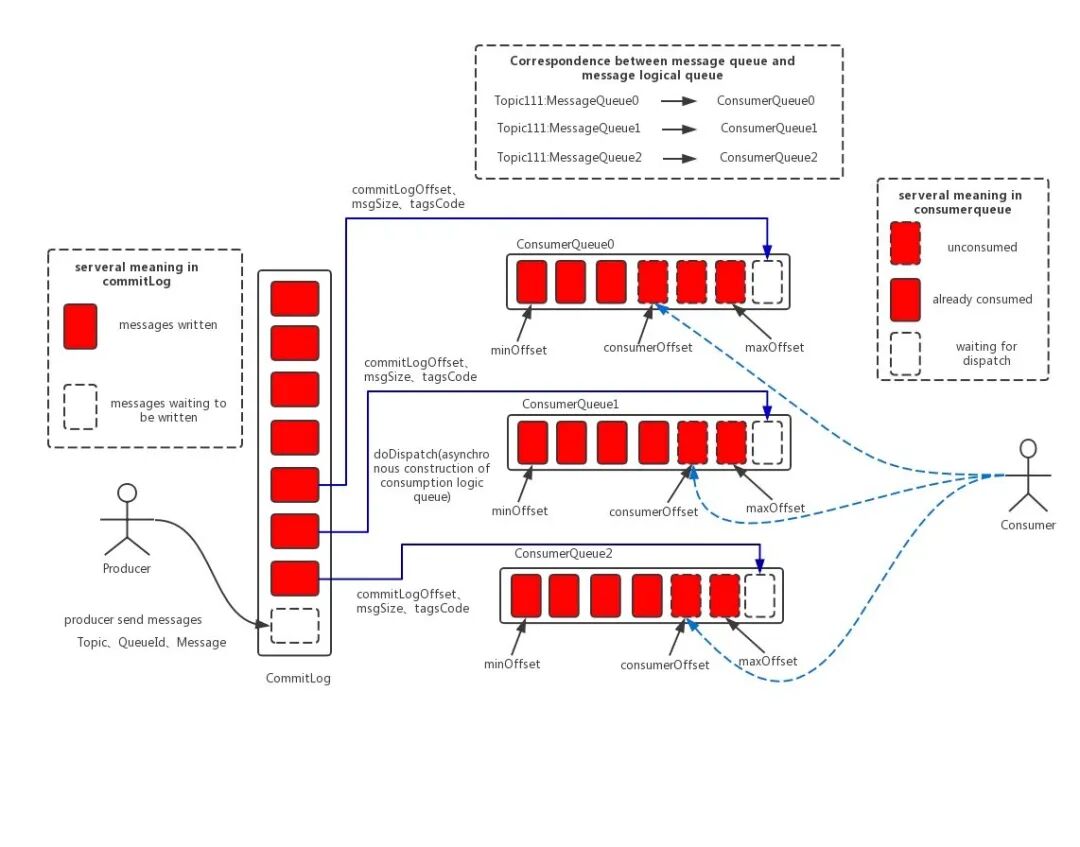
上面这个图我们可以更简化一下:
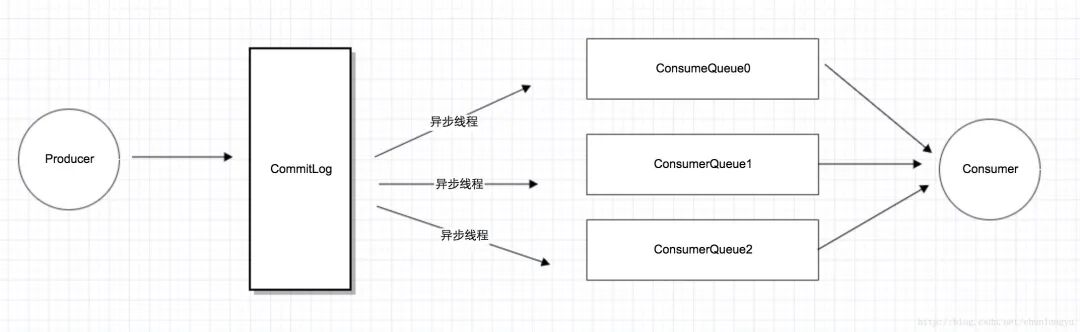
RocketMQ 为 Producer 和 Consumer 分别设计了不同的存储结构,Producer 对应 CommitLog, Consumer 对应 ConsumeQueue。
这其实是“异步化“,或者说”离线计算“的一个典型例子。这里之所以可以用“异步线程”,也是因为消息队列天生就是用来“缓冲消息”的。只要消息到了 CommitLog,发送的消息也就不会丢。只要消息不丢,那就有了“充足的回旋余地”,用一个后台线程慢慢同步到 ConsumeQueue,再由 Consumer 消费。可以说,这也是在消息队列内部的一个典型的“最终一致性”的案例:Producer 发了消息,进了 CommitLog,此时 Consumer 并不可见。但没关系,只要消息不丢,消息最终肯定会进入 ConsumeQueue,让 Consumer 可见。
CommitLog
消息主体以及元数据的存储主体,存储 Producer 端写入的消息主体内容,消息内容不是定长的。
生成规则
CommitLog 单个文件大小默认 1G, 文件名长度为 20 位,左边补零,剩余为起始偏移量,比如 00000000000000000000 代表了第一个文件,起始偏移量为 0,文件大小为 1G=1073741824;当第一个文件写满了,第二个文件为 00000000001073741824,起始偏移量为 1073741824,以此类推。消息主要是顺序写入日志文件,当文件满了,写入下一个文件。
存储路径
 1❯ cd ~/store
 2
 3~/store
 4❯ ll
 5total 16
 6-rw-r--r--   1 root  staff     0B Dec  6 10:48 abort
 7-rw-r--r--   1 root  staff   4.0K Dec  6 15:46 checkpoint
 8drwxr-xr-x   3 root  staff    96B Sep  7 16:30 commitlog
 9drwxr-xr-x  12 root  staff   384B Dec  6 15:46 config
10drwxr-xr-x   5 root  staff   160B Nov 30 14:06 consumequeue
11drwxr-xr-x   3 root  staff    96B Dec  6 11:46 index
12-rw-r--r--   1 root  staff     4B Dec  6 11:46 lock
存储规则
RocketMQ 采用了单一的日志文件,即把同一台机器上面所有 topic 的消息,存放在一个文件里面,从而避免了随机的磁盘写入,提高了性能。
RocketMQ 中主要保存了 CommitLog、Consume Queue、Index File 三种数据文件。由于内存和磁盘都是有限的资源,Broker 不可能永久地保存所有数据,所以一些超过保存期限的数据会被定期删除。RocketMQ 通过设置数据过期时间来删除额外的数据文件。
什么样的文件可以被删除?
如果非当前写文件在一定时间间隔内没有再次被更新,则认为是过期文件,可以被删除。
RocketMQ 不会管这个这个文件上的消息是否被全部消费。默认每个文件的过期时间为 72 小时。
1 // The number of hours to keep a log file before deleting it (in hours)
2    @ImportantField
3    private int fileReservedTime = 72;
通过在 Broker 配置文件中设置 fileReservedTime 来改变过期时间,单位为小时
1brokerClusterName = DefaultCluster
2brokerName = broker-a
3brokerId = 0
4deleteWhen = 04
5fileReservedTime = 48
6brokerRole = ASYNC_MASTER
7flushDiskType = ASYNC_FLUSH
删除的整体流程是在 DefaultMessageStore 中启动了一个定时任务来执行的删除操作:
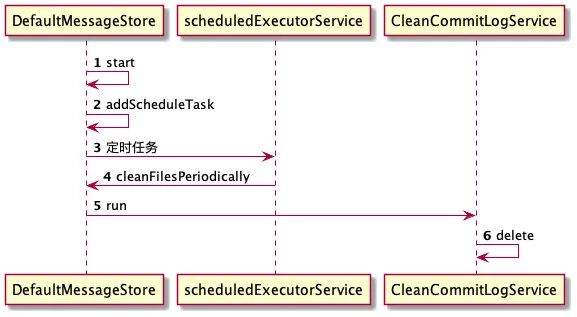
这个定时的周期是 10 秒,每 10 秒会执行一次,可以通过修改参数配置。
1// Resource reclaim interval
2//private int cleanResourceInterval = 10000;
3
4 this.scheduledExecutorService.scheduleAtFixedRate(new Runnable() {
5            @Override
6            public void run() {
7                DefaultMessageStore.this.cleanFilesPeriodically();
8            }
9        }, 1000 * 60, this.messageStoreConfig.getCleanResourceInterval(), TimeUnit.MILLISECONDS);
具体逻辑是这样的:
 1 private void deleteExpiredFiles() {
 2
 3    int deleteCount = 0;
 4    long fileReservedTime = DefaultMessageStore.this.getMessageStoreConfig().getFileReservedTime();
 5    int deletePhysicFilesInterval = DefaultMessageStore.this.getMessageStoreConfig().getDeleteCommitLogFilesInterval();
 6    int destroyMapedFileIntervalForcibly = DefaultMessageStore.this.getMessageStoreConfig().getDestroyMapedFileIntervalForcibly();
 7
 8    boolean timeup = this.isTimeToDelete();
 9    boolean spacefull = this.isSpaceToDelete();
10    boolean manualDelete = this.manualDeleteFileSeveralTimes > 0;
11
12    if (timeup || spacefull || manualDelete) {
13
14        if (manualDelete)
15            this.manualDeleteFileSeveralTimes--;
16
17        boolean cleanAtOnce = DefaultMessageStore.this.getMessageStoreConfig().isCleanFileForciblyEnable() && this.cleanImmediately;
18
19        log.info("begin to delete before {} hours file. timeup: {} spacefull: {} manualDeleteFileSeveralTimes: {} cleanAtOnce: {}",
20            fileReservedTime,
21            timeup,
22            spacefull,
23            manualDeleteFileSeveralTimes,
24            cleanAtOnce);
25
26        fileReservedTime *= 60 * 60 * 1000;
27
28        deleteCount = DefaultMessageStore.this.commitLog.deleteExpiredFile(fileReservedTime, deletePhysicFilesInterval,
29            destroyMapedFileIntervalForcibly, cleanAtOnce);
30        if (deleteCount > 0) {
31        } else if (spacefull) {
32            log.warn("disk space will be full soon, but delete file failed.");
33        }
34    }
35}
可以看到,当满足以下三个条件之一时,将执行删除操作:
当前时间等于已经配置的删除时间,默认为凌晨 4 点,开始执行删除文件操作
1// When to delete,default is at 4 am
2 @ImportantField
3 private String deleteWhen = "04";
磁盘使用空间超过 85%
1private final double diskSpaceCleanForciblyRatio =
2            Double.parseDouble(System.getProperty("rocketmq.broker.diskSpaceCleanForciblyRatio", "0.85"));
手动执行删除,预留,可以通过调用 excuteDeleteFilesManualy 方法手工触发过期文件删除,目前 RocketMQ 暂未封装手工触发文件删除的命令。
数据结构
从源码上直接看一下 CommitLog 存储时逻辑上的数据结构情况(代码源自 CommitLog 类):
 1protected PutMessageResult encode(MessageExtBrokerInner msgInner) {
 2    /**
 3     * Serialize message
 4     */
 5    final byte[] propertiesData =
 6            msgInner.getPropertiesString() == null ? null : msgInner.getPropertiesString().getBytes(MessageDecoder.CHARSET_UTF8);
 7
 8    final int propertiesLength = propertiesData == null ? 0 : propertiesData.length;
 9
10    if (propertiesLength > Short.MAX_VALUE) {
11        log.warn("putMessage message properties length too long. length={}", propertiesData.length);
12        return new PutMessageResult(PutMessageStatus.PROPERTIES_SIZE_EXCEEDED, null);
13    }
14
15    final byte[] topicData = msgInner.getTopic().getBytes(MessageDecoder.CHARSET_UTF8);
16    final int topicLength = topicData.length;
17
18    final int bodyLength = msgInner.getBody() == null ? 0 : msgInner.getBody().length;
19
20    final int msgLen = calMsgLength(msgInner.getSysFlag(), bodyLength, topicLength, propertiesLength);
21
22    // Exceeds the maximum message
23    if (msgLen > this.maxMessageSize) {
24        CommitLog.log.warn("message size exceeded, msg total size: " + msgLen + ", msg body size: " + bodyLength
25                + ", maxMessageSize: " + this.maxMessageSize);
26        return new PutMessageResult(PutMessageStatus.MESSAGE_ILLEGAL, null);
27    }
28
29    // Initialization of storage space
30    this.resetByteBuffer(encoderBuffer, msgLen);
31    // 1 TOTALSIZE
32    this.encoderBuffer.putInt(msgLen);
33    // 2 MAGICCODE
34    this.encoderBuffer.putInt(CommitLog.MESSAGE_MAGIC_CODE);
35    // 3 BODYCRC
36    this.encoderBuffer.putInt(msgInner.getBodyCRC());
37    // 4 QUEUEID
38    this.encoderBuffer.putInt(msgInner.getQueueId());
39    // 5 FLAG
40    this.encoderBuffer.putInt(msgInner.getFlag());
41    // 6 QUEUEOFFSET, need update later
42    this.encoderBuffer.putLong(0);
43    // 7 PHYSICALOFFSET, need update later
44    this.encoderBuffer.putLong(0);
45    // 8 SYSFLAG
46    this.encoderBuffer.putInt(msgInner.getSysFlag());
47    // 9 BORNTIMESTAMP
48    this.encoderBuffer.putLong(msgInner.getBornTimestamp());
49    // 10 BORNHOST
50    socketAddress2ByteBuffer(msgInner.getBornHost() ,this.encoderBuffer);
51    // 11 STORETIMESTAMP
52    this.encoderBuffer.putLong(msgInner.getStoreTimestamp());
53    // 12 STOREHOSTADDRESS
54    socketAddress2ByteBuffer(msgInner.getStoreHost() ,this.encoderBuffer);
55    // 13 RECONSUMETIMES
56    this.encoderBuffer.putInt(msgInner.getReconsumeTimes());
57    // 14 Prepared Transaction Offset
58    this.encoderBuffer.putLong(msgInner.getPreparedTransactionOffset());
59    // 15 BODY
60    this.encoderBuffer.putInt(bodyLength);
61    if (bodyLength > 0)
62        this.encoderBuffer.put(msgInner.getBody());
63    // 16 TOPIC
64    this.encoderBuffer.put((byte) topicLength);
65    this.encoderBuffer.put(topicData);
66    // 17 PROPERTIES
67    this.encoderBuffer.putShort((short) propertiesLength);
68    if (propertiesLength > 0)
69        this.encoderBuffer.put(propertiesData);
70
71    encoderBuffer.flip();
72    return null;
73}
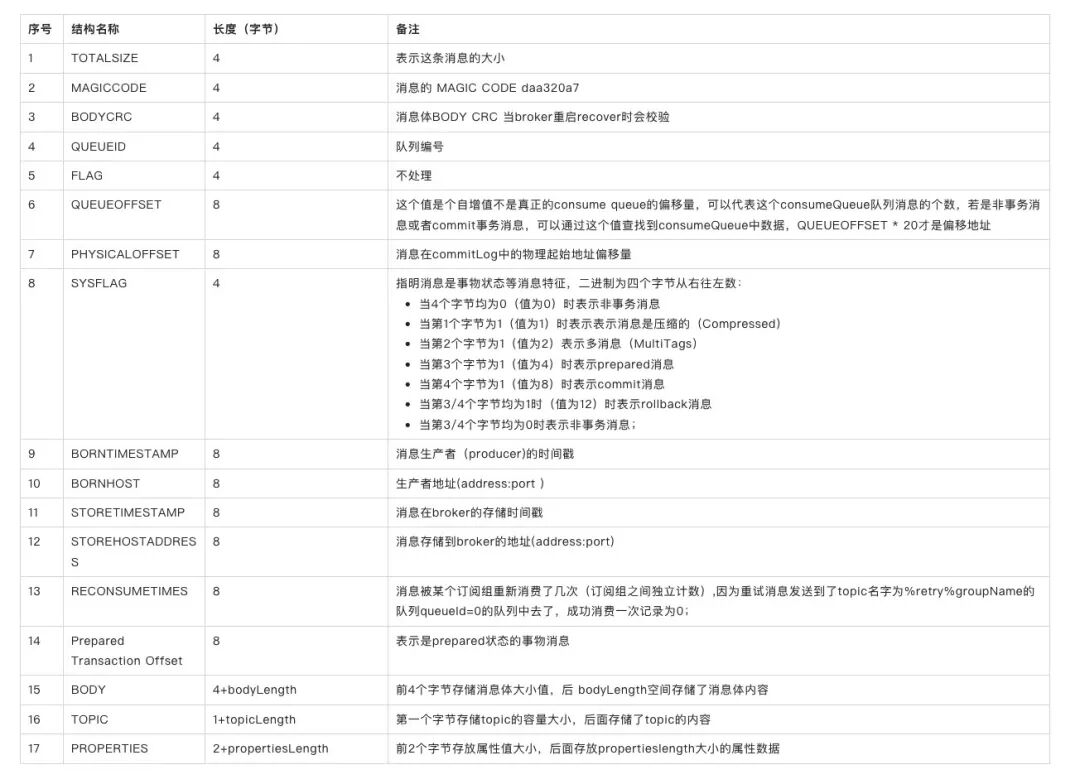
结合上表,一条消息的存储内容如下: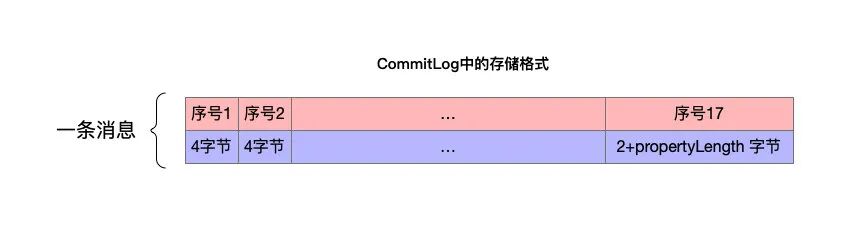
将所有的消息存储在一起就是 CommitLog 的全部内容,如下: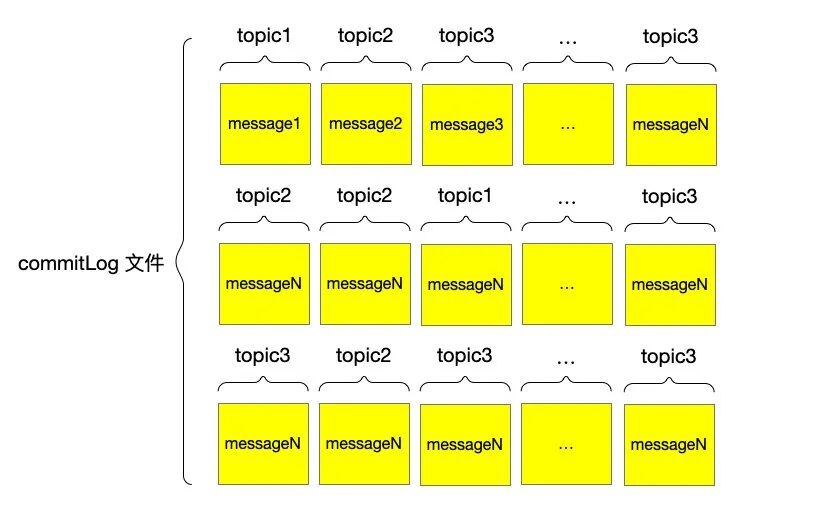
注意以上图中所画为抽象结构,具体实现上 commitLog 内部还有
- MappedFile
- MappedFileQueue
 1public class CommitLog {
 2    // Message's MAGIC CODE daa320a7
 3    public final static int MESSAGE_MAGIC_CODE = -626843481;
 4    protected static final InternalLogger log = InternalLoggerFactory.getLogger(LoggerName.STORE_LOGGER_NAME);
 5    // End of file empty MAGIC CODE cbd43194
 6    protected final static int BLANK_MAGIC_CODE = -875286124;
 7    protected final MappedFileQueue mappedFileQueue;
 8    protected final DefaultMessageStore defaultMessageStore;
 9
10
11public class MappedFileQueue {
12    private static final InternalLogger log = InternalLoggerFactory.getLogger(LoggerName.STORE_LOGGER_NAME);
13    private static final InternalLogger LOG_ERROR = InternalLoggerFactory.getLogger(LoggerName.STORE_ERROR_LOGGER_NAME);
14
15    private static final int DELETE_FILES_BATCH_MAX = 10;
16
17    private final String storePath;
18
19    protected final int mappedFileSize;
20
21    protected final CopyOnWriteArrayList<MappedFile> mappedFiles = new CopyOnWriteArrayList<MappedFile>();
CommitLog MappedFileQueue MappedFile 三者的关系如下:
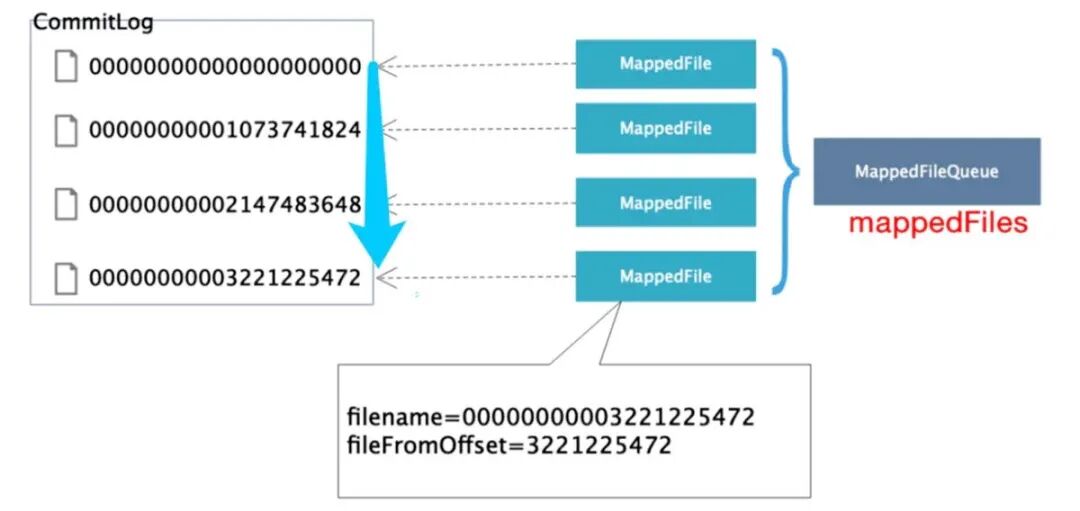
MappedFile 和物理文件是一一对应的。
这一点我们可以从 MappedFileQueue 的 load 方法中看出:
 1public boolean load() {
 2
 3    File dir = new File(this.storePath);
 4    File[] ls = dir.listFiles();
 5    if (ls != null) {
 6        return doLoad(Arrays.asList(ls));
 7    }
 8    return true;
 9}
10
11public boolean doLoad(List<File> files) {
12    // ascending order
13    files.sort(Comparator.comparing(File::getName));
14
15    for (File file : files) {
16        if (file.length() != this.mappedFileSize) {
17            log.warn(file + "\t" + file.length()
18                    + " length not matched message store config value, ignore it");
19            return true;
20        }
21
22        try {
23            MappedFile mappedFile = new MappedFile(file.getPath(), mappedFileSize);
24
25            mappedFile.setWrotePosition(this.mappedFileSize);
26            mappedFile.setFlushedPosition(this.mappedFileSize);
27            mappedFile.setCommittedPosition(this.mappedFileSize);
28            this.mappedFiles.add(mappedFile);
29            log.info("load " + file.getPath() + " OK");
30        } catch (IOException e) {
31            log.error("load file " + file + " error", e);
32            return false;
33        }
34    }
35    return true;
36}
ConsumeQueue
上文我们讲了 RocketMQ 将所有 topic 的消息都存储在 CommitLog 中,由于是顺序写所以性能比较好,那么随之而来的问题就是查询或者说读取消息的时候怎么办?用这个结构存储效率高,但如果用这个结构读取消息看起来不方便,那 RocketMQ 是怎么做的呢?
如果你本地有 commitLog 文件,可以直接读取一下看看数据:
 1 public static ByteBuffer read(String path) throws Exception {
 2        File file = new File(path);
 3        FileInputStream fin = new FileInputStream(file);
 4        byte[] bytes = new byte[(int) file.length()];
 5        fin.read(bytes);
 6        ByteBuffer buffer = ByteBuffer.wrap(bytes);
 7        return buffer;
 8    }
 9
10    public static void main(String[] args) throws Exception {
11        String filePath = "/Users/xiaohezi/store/commitlog/00000000000000000000";
12        ByteBuffer buffer = read(filePath);
13        List<MessageExt> messageList = new ArrayList<>();
14        while (true) {
15            MessageExt decodeMsgs = MessageDecoder.decode(buffer);
16            if (decodeMsgs == null) {
17                break;
18            }
19            messageList.add(decodeMsgs);
20        }
21        for (MessageExt ms : messageList) {
22            System.out.println("主题:" + ms.getTopic() + " 消息:" +
23                    new String(ms.getBody()) + "队列 ID:" + ms.getQueueId() + " 存储地址:" + ms.getStoreHost());
24        }
25    }
程序执行的效率其实并不低,那么 RocketMQ 是怎样进行高效的检索消息的呢 ?
为了说清楚这个问题,我们先来看个基本概念
MessageQueue
先来个图直观地感受一下: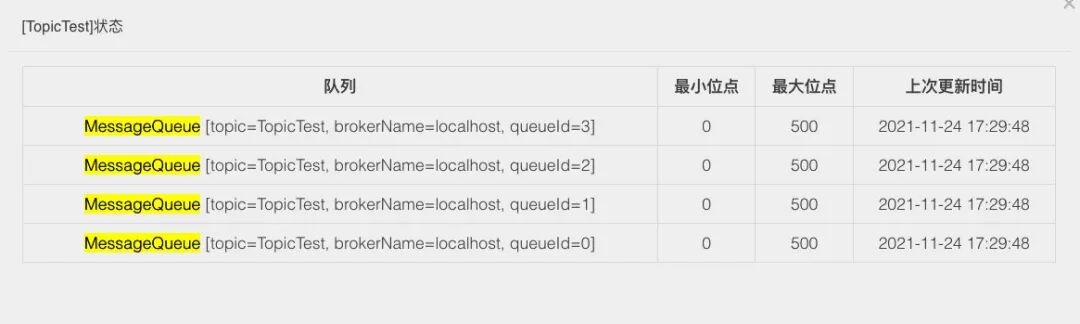
所谓 MessageQueue 虽然直译是“消息队列”,但它和我们所理解的 “分片”、“分区” 是一回事儿。以后提到 RocketMQ 的 分区、分片、队列其实都是对应 messageQueue。
比如我们的 Topic 里面有 100 条数据,该 Topic 默认是 4 个队列,那么每个队列中大约 25 条数据。然后,这些 MessageQueue 是和 Broker 绑定在一起的,就是说每个 MessageQueue 都可能处于不同的 Broker 机器上,这取决于你的队列数量和 Broker 集群。
既然 MessageQueue 是多个,那么在消息发送的时候,势必要通过某种方式选择一个队列。默认的情况下,就是通过轮询来获取一个消息队列。
在消息发送时候的应用如下面引用的官方文档所述:
“
Producer 端在发送消息的时候,会先根据 Topic 找到指定的 TopicPublishInfo,在获取了 TopicPublishInfo 路由信息后,RocketMQ 的客户端在默认方式下 selectOneMessageQueue() 方法会从 TopicPublishInfo 中的 messageQueueList 中选择一个队列(MessageQueue)进行发送消息。具体的容错策略均在 MQFaultStrategy 这个类中定义。这里有一个 sendLatencyFaultEnable 开关变量,如果开启,在随机递增取模的基础上,再过滤掉 not available 的 Broker 代理。所谓的"latencyFaultTolerance" ,是指对之前失败的,按一定的时间做退避。例如,如果上次请求的 latency 超过 550Lms,就退避 3000Lms;超过 1000L,就退避 60000L;如果关闭,采用随机递增取模的方式选择一个队列(MessageQueue)来发送消息,latencyFaultTolerance 机制是实现消息发送高可用的核心关键所在。
”
1public MessageQueue selectOneMessageQueue() {
2    int index = this.sendWhichQueue.incrementAndGet();
3    int pos = Math.abs(index) % this.messageQueueList.size();
4    if (pos < 0)
5        pos = 0;
6    return this.messageQueueList.get(pos);
7}
consumeQueue
接着我们来看下本节的重点 consumeQueue,先看下它的文件组织结构:
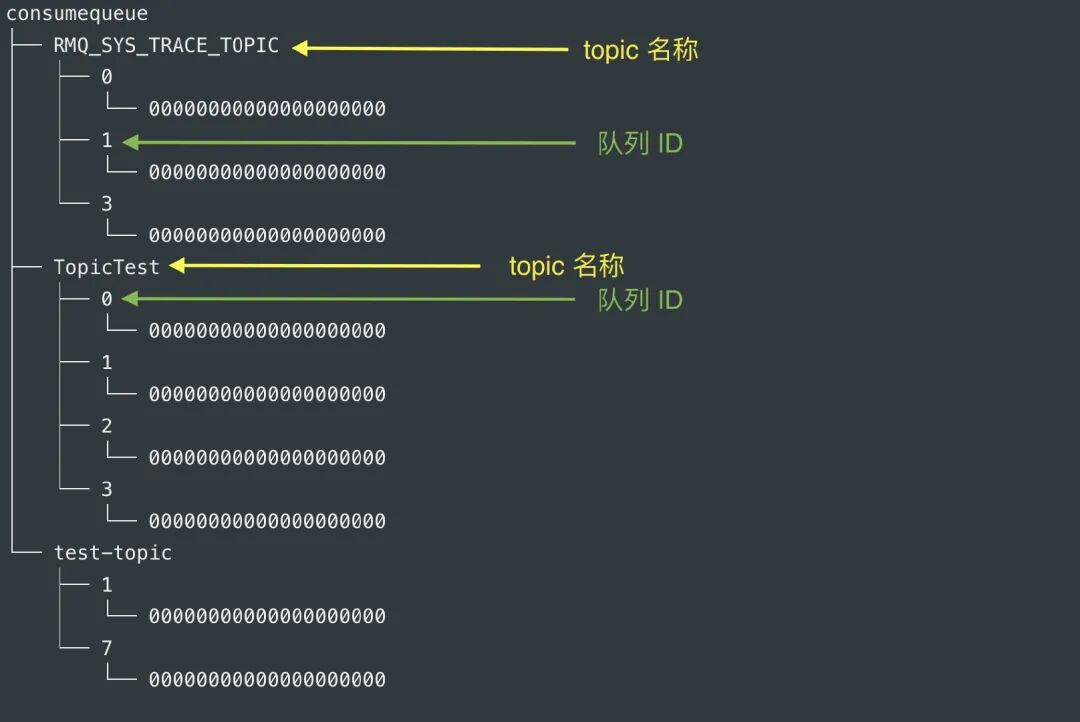
其中 队列 ID,就是以 MessageQueue 队列 ID 命名的。
每个 cosumequeue 文件的名称 fileName,名字长度为 20 位,左边补零,剩余为起始偏移量;比如 00000000000000000000 代表了第一个文件,起始偏移量为 0,文件大小为 600W,当第一个文件满之后创建的第二个文件的名字为 00000000000006000000,起始偏移量为 6000000,以此类推,第三个文件名字为 00000000000012000000,起始偏移量为 12000000,消息存储的时候会顺序写入文件,当文件满了,写入下一个文件。
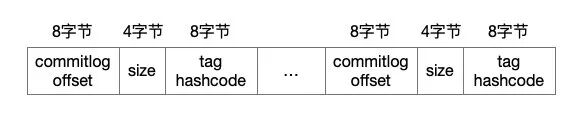
RocketMQ 的 ConsumeQueue 中不存储具体的消息,具体的消息由 CommitLog 存储,ConsumeQueue 中只存储路由到该 queue 中的消息在 CommitLog 中的 offset,消息的大小以及消息所属的 tag 的 hash(tagCode),一共只占 20 个字节:
我们可以按照这个格式输出一下 ConsumerQueue 文件的内容:
 1 public static void main(String[] args) throws Exception {
 2
 3    String path = "/Users/root/store/consumequeue/TopicTest/0/00000000000000000000";
 4    ByteBuffer buffer = read(path);
 5    while (true){
 6        long offset = buffer.getLong();
 7        long size = buffer.getInt();
 8        long code = buffer.getLong();
 9        if (size==0){
10            break;
11        }
12         System.out.println("消息长度:"+size+" 消息偏移量:" +offset+" tag hashcode:"+code);
13    }
14    System.out.println("--------------------------");
15
16}
17
18消息长度:201 消息偏移量:201 tag hashcode:2598919
19消息长度:201 消息偏移量:1005 tag hashcode:2598919
20消息长度:201 消息偏移量:1809 tag hashcode:2598919
21...
上面输出的结果中,消息偏移量的差值等于 = 消息长度 * 队列长度,具体到本例就是
804(1005-201) = 201 * 4(从 0-3 共 4 个队列)
为什么是这样?因为每个队列的初始偏移量不同,我以我本地 4 个队列 (0-3),每个队列只有一个文件(00000000000000000000)为例,则每个文件的初始 offset 为:
- 队列 0 偏移量 201
- 队列 1 偏移量 402
- 队列 2 偏移量 603
- 队列 3 偏移量 0
当读取一条消息时,会先读 ConsumeQueue,再读 CommitLog。怎么知道消息存储在哪个 CommitLog 文件上?看一下以下两段代码,出自 CommitLog 和 MappedFileQueue 2 个类:
 1 public SelectMappedBufferResult getData(final long offset, final boolean returnFirstOnNotFound) {
 2        int mappedFileSize = this.defaultMessageStore.getMessageStoreConfig().getMappedFileSizeCommitLog();
 3        MappedFile mappedFile = this.mappedFileQueue.findMappedFileByOffset(offset, returnFirstOnNotFound);
 4        if (mappedFile != null) {
 5            int pos = (int) (offset % mappedFileSize);
 6            SelectMappedBufferResult result = mappedFile.selectMappedBuffer(pos);
 7            return result;
 8        }
 9
10        return null;
11    }
12
13/**
14    * Finds a mapped file by offset.
15    *
16    * @param offset                Offset.
17    * @param returnFirstOnNotFound If the mapped file is not found, then return the first one.
18    * @return Mapped file or null (when not found and returnFirstOnNotFound is <code>false</code>).
19    */
20public MappedFile findMappedFileByOffset(final long offset, final boolean returnFirstOnNotFound) {
21    try {
22        MappedFile firstMappedFile = this.getFirstMappedFile();
23        MappedFile lastMappedFile = this.getLastMappedFile();
24        if (firstMappedFile != null && lastMappedFile != null) {
25            if (offset < firstMappedFile.getFileFromOffset() || offset >= lastMappedFile.getFileFromOffset() + this.mappedFileSize) {
26                LOG_ERROR.warn("Offset not matched. Request offset: {}, firstOffset: {}, lastOffset: {}, mappedFileSize: {}, mappedFiles count: {}",
27                        offset,
28                        firstMappedFile.getFileFromOffset(),
29                        lastMappedFile.getFileFromOffset() + this.mappedFileSize,
30                        this.mappedFileSize,
31                        this.mappedFiles.size());
32            } else {
33                int index = (int) ((offset / this.mappedFileSize) - (firstMappedFile.getFileFromOffset() / this.mappedFileSize));
34                MappedFile targetFile = null;
35                try {
36                    targetFile = this.mappedFiles.get(index);
37                } catch (Exception ignored) {
38                }
39
40                if (targetFile != null && offset >= targetFile.getFileFromOffset()
41                        && offset < targetFile.getFileFromOffset() + this.mappedFileSize) {
42                    return targetFile;
43                }
44
45                for (MappedFile tmpMappedFile : this.mappedFiles) {
46                    if (offset >= tmpMappedFile.getFileFromOffset()
47                            && offset < tmpMappedFile.getFileFromOffset() + this.mappedFileSize) {
48                        return tmpMappedFile;
49                    }
50                }
51            }
52
53            if (returnFirstOnNotFound) {
54                return firstMappedFile;
55            }
56        }
57    } catch (Exception e) {
58        log.error("findMappedFileByOffset Exception", e);
59    }
60
61    return null;
62}
假设 1073742827 为物理偏移量(物理偏移量也即全局偏移量),则其对应的相对偏移量为 1003(1003 = 1073742827 - 1073741824),并且该偏移量位于第二个 CommitLog。
根据上面的代码,当我们从 commitLog 文件列表根据 consumeQueue 提供的偏移量 offset 就可以锁定具体的 commitLog 文件,然后根据 offset 计算出 position, 可以找到对应的消息。
 1 public SelectMappedBufferResult selectMappedBuffer(int pos) {
 2    int readPosition = getReadPosition();
 3    if (pos < readPosition && pos >= 0) {
 4        if (this.hold()) {
 5            ByteBuffer byteBuffer = this.mappedByteBuffer.slice();
 6            byteBuffer.position(pos);
 7            int size = readPosition - pos;
 8            ByteBuffer byteBufferNew = byteBuffer.slice();
 9            byteBufferNew.limit(size);
10            return new SelectMappedBufferResult(this.fileFromOffset + pos, byteBufferNew, size, this);
11        }
12    }
13
14    return null;
15}
除了通过 offset 找到对应的消息,还要以通过 message ID 查找。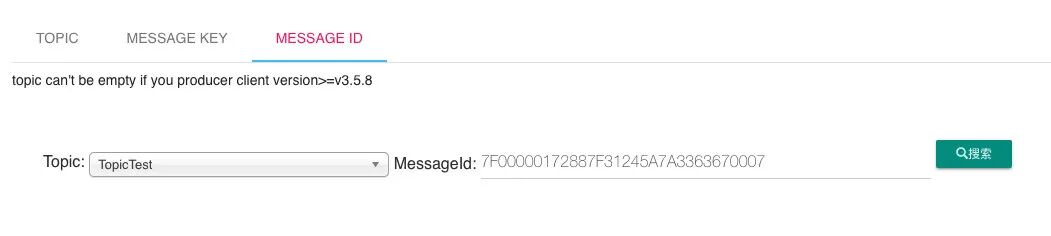
原理是一样的,只不过会先通过 message ID 将偏移量解析出来:
 1public static MessageId decodeMessageId(final String msgId) throws UnknownHostException {
 2    SocketAddress address;
 3    long offset;
 4    int ipLength = msgId.length() == 32 ? 4 * 2 : 16 * 2;
 5
 6    byte[] ip = UtilAll.string2bytes(msgId.substring(0, ipLength));
 7    byte[] port = UtilAll.string2bytes(msgId.substring(ipLength, ipLength + 8));
 8    ByteBuffer bb = ByteBuffer.wrap(port);
 9    int portInt = bb.getInt(0);
10    address = new InetSocketAddress(InetAddress.getByAddress(ip), portInt);
11
12    // offset
13    byte[] data = UtilAll.string2bytes(msgId.substring(ipLength + 8, ipLength + 8 + 16));
14    bb = ByteBuffer.wrap(data);
15    offset = bb.getLong(0);
16
17    return new MessageId(address, offset);
18}
consumeQueue 文件是何时创建并更新的?
ConsumeQueue 是消息消费队列文件,消息达到 commitlog 文件后将被异步转发到消息消费队列,供消息消费者消费。
RocketMQ 的具体做法是,使用 Broker 端的后台服务线程—ReputMessageService 不停地分发请求并异步构建 ConsumeQueue
indexFile
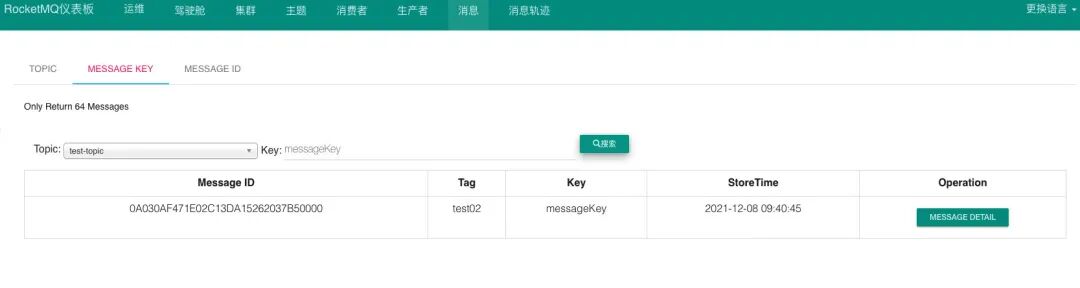
上图中有一个查询类型是通过messageKey 查询。
它是一种模型查询,查询条件是:Topic+Message Key。说起查询,阿里云有一个推荐的消息查询过程: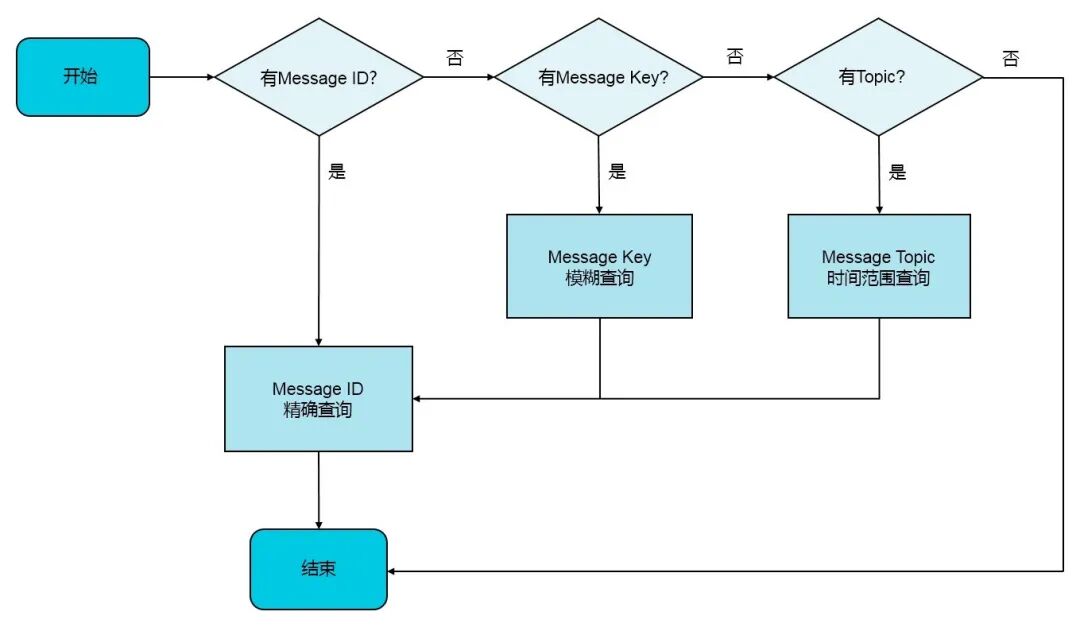
messagekey 是什么,它的作用又是什么呢?
顾名思义就是消息的一个标识,可以在客户端发送消息时设置,主要用来在业务上区别每条消息的不同,比如一般我们会把 订单 id、用户 id能在业务上达到区别数据的目的是值设置进去,以方便后面的查询。
 1@GetMapping("/produce")
 2public void produceMsg() {
 3
 4    Map<String, Object> headers = Maps.newHashMapWithExpectedSize(16);
 5    headers.put(MessageConst.PROPERTY_TAGS, "test02");
 6    headers.put(MessageConst.PROPERTY_KEYS,"messageKey");
 7
 8    Message message = MessageBuilder.createMessage("Hello RocketMQ!", new MessageHeaders(headers));
 9    output.send(message);
10    System.out.println("发送了消息 " + message);
11
12}
如果我们想根据 messageKey 来查询消息,RocketMQ 是怎么做的呢?
RocketMQ 引入 Hash 索引机制,为消息建立索引,像上文的 messageKey 就是根据索引查询出来的。IndexFile 是消息索引文件,主要存储的是 key 和 offset 的对应关系。
indexFile(索引文件)提供了一种可以通过 key 或时间区间来查询消息的方法。文件名 fileName 是以创建时的时间戳命名的,固定的单个 IndexFile 文件大小约为 400M,一个 IndexFile 可以保存 2000W 个索引。
RocketMQ 的索引文件逻辑结构,类似 JDK 中 HashMap 的实现。索引文件的具体结构如下:
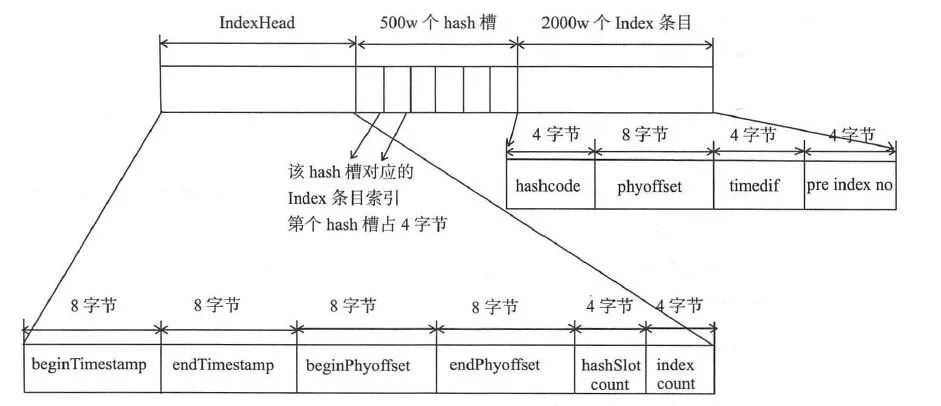
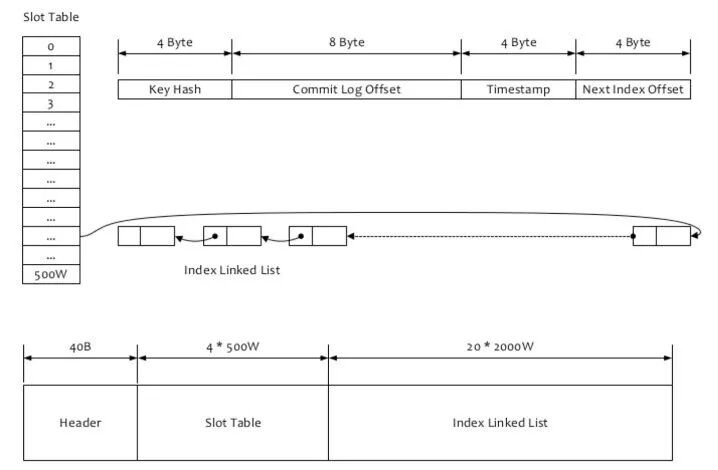
文件由以下几部分组成:
- indexHeader
- 500w 个 hash 槽
- 2000w 个 index 条目
indexHeader
IndexFile 的头部,占 40 个字节。主要包含以下字段
- beginTimestamp:该 IndexFile 文件中包含消息的最小存储时间。
- endTimestamp:该 IndexFile 文件中包含消息的最大存储时间。
- beginPhyoffset:该 IndexFile 文件中包含消息的最小 CommitLog 文件偏移量。
- endPhyoffset:该 IndexFile 文件中包含消息的最大 CommitLog 文件偏移量。
- hashSlotcount:该 IndexFile 文件中包含的 hashSlot 的总数。
- indexCount:该 IndexFile 文件中已使用的 Index 条目个数。
 1public class IndexHeader {
 2    public static final int INDEX_HEADER_SIZE = 40;
 3    private static int beginTimestampIndex = 0;
 4    private static int endTimestampIndex = 8;
 5    private static int beginPhyoffsetIndex = 16;
 6    private static int endPhyoffsetIndex = 24;
 7    private static int hashSlotcountIndex = 32;
 8    private static int indexCountIndex = 36;
 9    private final ByteBuffer byteBuffer;
10    private AtomicLong beginTimestamp = new AtomicLong(0);
11    private AtomicLong endTimestamp = new AtomicLong(0);
12    private AtomicLong beginPhyOffset = new AtomicLong(0);
13    private AtomicLong endPhyOffset = new AtomicLong(0);
14    private AtomicInteger hashSlotCount = new AtomicInteger(0);
15
16    private AtomicInteger indexCount = new AtomicInteger(1);
slot table
4*500W 的 Slot Table 并不保存真正的索引数据,而是保存每个槽位对应的单向链表的头
索引数据
20*2000W 是真正的索引数据,即一个 Index File 可以保存 2000W 个索引。
怎么给一条消息建议索引 ?
先是根据 key 计算 hashcode,对 500w 取模,就可以知道位于哪个 hash 槽。indexHead 占了文件的前面的 40 字节。然后每个 hash 槽占 4 个字节。具体在文件的位置是由公式 40 + keyIndex*4 计算得到的。
再计算 index 条目位置,一条消息 hash 槽的位置是根据 key 决定的,index 条目的位置是放入的顺序决定的,这叫顺序写。index 条目首先要跨过 indexHead 和 500w 个 hash 槽的大小。然后根据当前是第几条 index 条目,就放入到第几个位置去。计算公式是:
40 个字节的 indexHead+500w 个 * 4 字节的 hash 槽大小 + 当前 index 索引的值 * 20 字节
怎么查询索引文件 ?
“
“按照 Message Key 查询消息”的方式,RocketMQ 的具体做法是,主要通过 Broker 端的 QueryMessageProcessor 业务处理器来查询,读取消息的过程就是用 topic 和 key 找到 IndexFile 索引文件中的一条记录,根据其中的 commitLog offset 从 CommitLog 文件中读取消息的实体内容。
”
我们发送的消息体中,包含 Message Key 或 Unique Key,那么就会给它们每一个都构建索引,索引文件根据 key 来查询消息的流程主要是:
- 根据查询的 key 的 hashcode%slotNum 得到具体的槽的位置 (slotNum 是一个索引文件里面包含的最大槽的数目,例如图中所示 slotNum=500w)
- 根据 slotValue(slot 位置对应的值)查找到索引项列表的最后一项(倒序排列,slotValue 总是指向最新的一个索引项)
- 遍历索引项列表返回查询时间范围内的结果集(默认一次最大返回的 32 条记录)
 1 public boolean putKey(final String key, final long phyOffset, final long storeTimestamp) {
 2    if (this.indexHeader.getIndexCount() < this.indexNum) {
 3        int keyHash = indexKeyHashMethod(key);
 4        int slotPos = keyHash % this.hashSlotNum;
 5        int absSlotPos = IndexHeader.INDEX_HEADER_SIZE + slotPos * hashSlotSize;
 6
 7        FileLock fileLock = null;
 8
 9        try {
10
11            // fileLock = this.fileChannel.lock(absSlotPos, hashSlotSize,
12            // false);
13            int slotValue = this.mappedByteBuffer.getInt(absSlotPos);
14            if (slotValue <= invalidIndex || slotValue > this.indexHeader.getIndexCount()) {
15                slotValue = invalidIndex;
16            }
17
18            long timeDiff = storeTimestamp - this.indexHeader.getBeginTimestamp();
19
20            timeDiff = timeDiff / 1000;
21
22            if (this.indexHeader.getBeginTimestamp() <= 0) {
23                timeDiff = 0;
24            } else if (timeDiff > Integer.MAX_VALUE) {
25                timeDiff = Integer.MAX_VALUE;
26            } else if (timeDiff < 0) {
27                timeDiff = 0;
28            }
29
30            int absIndexPos =
31                    IndexHeader.INDEX_HEADER_SIZE + this.hashSlotNum * hashSlotSize
32                            + this.indexHeader.getIndexCount() * indexSize;
33
34            this.mappedByteBuffer.putInt(absIndexPos, keyHash);
35            this.mappedByteBuffer.putLong(absIndexPos + 4, phyOffset);
36            this.mappedByteBuffer.putInt(absIndexPos + 4 + 8, (int) timeDiff);
37            this.mappedByteBuffer.putInt(absIndexPos + 4 + 8 + 4, slotValue);
38
39            this.mappedByteBuffer.putInt(absSlotPos, this.indexHeader.getIndexCount());
40
41            if (this.indexHeader.getIndexCount() <= 1) {
42                this.indexHeader.setBeginPhyOffset(phyOffset);
43                this.indexHeader.setBeginTimestamp(storeTimestamp);
44            }
45
46            if (invalidIndex == slotValue) {
47                this.indexHeader.incHashSlotCount();
48            }
49            this.indexHeader.incIndexCount();
50            this.indexHeader.setEndPhyOffset(phyOffset);
51            this.indexHeader.setEndTimestamp(storeTimestamp);
52
53            return true;
54        } catch (Exception e) {
55            log.error("putKey exception, Key: " + key + " KeyHashCode: " + key.hashCode(), e);
56        } finally {
57            if (fileLock != null) {
58                try {
59                    fileLock.release();
60                } catch (IOException e) {
61                    log.error("Failed to release the lock", e);
62                }
63            }
64        }
65    } else {
66        log.warn("Over index file capacity: index count = " + this.indexHeader.getIndexCount()
67                + "; index max num = " + this.indexNum);
68    }
69
70    return false;
71}
简单说就是:先是根据 key 计算 hashcode,对 500w 取模,就可以知道位于哪个 hash 槽。根据槽值的内容,再通过计算 index 条目位置,获取到 index 条目,再依次获取上一个 hash 冲突节点的 index 条目。
总结
RocketMQ 文件存储模型层次结构
RocketMQ 存储的文件主要包括 Commitlog 文件、ConsumeQueue 文件、Index 文件。
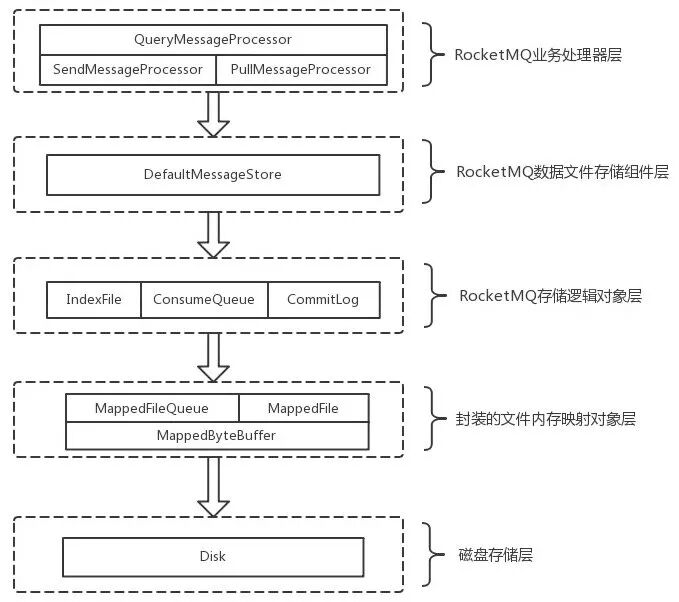
消息存储是由 ConsumeQueue 和 CommitLog 配合完成。CommitLog 存储消息真正内容的文件。他们都有各自的生成规则、存储路径、数据结构。内部还有与与他们相映射的 java 数据结构如 MappedFile、MappedByteBuffer、MappedFileQueue 等。
“
RocketMQ 采用的是混合型的存储结构,即为 Broker 单个实例下所有的队列共用一个日志数据文件(即为 CommitLog)来存储。RocketMQ 的混合型存储结构(多个 Topic 的消息实体内容都存储于一个 CommitLog 中)针对 Producer 和 Consumer 分别采用了数据和索引部分相分离的存储结构,Producer 发送消息至 Broker 端,然后 Broker 端使用同步或者异步的方式对消息刷盘持久化,保存至 CommitLog 中。只要消息被刷盘持久化至磁盘文件 CommitLog 中,那么 Producer 发送的消息就不会丢失。正因为如此,Consumer 也就肯定有机会去消费这条消息。当无法拉取到消息后,可以等下一次消息拉取,同时服务端也支持长轮询模式,如果一个消息拉取请求未拉取到消息,Broker 允许等待 30s 的时间,只要这段时间内有新消息到达,将直接返回给消费端。这里,RocketMQ 的具体做法是,使用 Broker 端的后台服务线程—ReputMessageService 不停地分发请求并异步构建 ConsumeQueue(逻辑消费队列)和 IndexFile(索引文件)数据。
”
ConsumeQueue(逻辑消费队列)作为消费消息的索引,保存了指定 Topic 下的队列消息在 CommitLog 中的起始物理偏移量 offset,消息大小 size 和消息 Tag 的 HashCode 值。而 IndexFile(索引文件)则只是为了消息查询提供了一种通过 key 或时间区间来查询消息的方法。
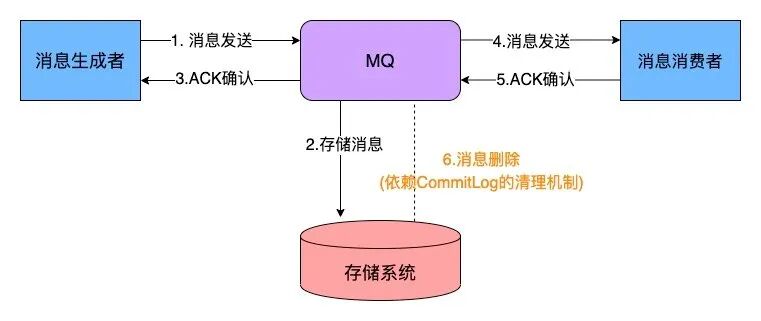
最后结合消息的生产、消费与存储来一起看一下这个流程:
参考
- https://github.com/apache/rocketmq/blob/master/docs/cn/architecture.md
- https://github.com/apache/rocketmq/blob/master/docs/cn/design.md
- https://blog.csdn.net/prestigeding/article/details/79482339
- https://www.cnblogs.com/zuoyang/p/14465764.html
- https://fdx321.github.io/2017/08/22/%E3%80%90RocketMQ%E6%BA%90%E7%A0%81%E5%AD%A6%E4%B9%A0%E3%80%916-%E6%B6%88%E6%81%AF%E5%AD%98%E5%82%A8/
- https://juejin.cn/post/6844904149725741064#heading-7
- https://help.aliyun.com/document_detail/29540.html
- https://cloud.tencent.com/developer/article/1581366
- http://blog.pkspace.cn/article/14
- https://blog.csdn.net/wengfuying5308/article/details/106535405