
单元测试框架
Java 中,JUnit 和 TestNG 是最受欢迎的单元测试框架。
- JUnit
- TestNG
JUnit
首先是大名鼎鼎的 JUnit ,JUnit 已经成为 Java 应用程序单元测试的事实标准。
JUnit 是一个开源的 Java 语言的单元测试框架,专门针对 Java 设计,使用最广泛。JUnit 目前最新版本是 5
JUnit5 的组成:JUnit 5 = JUnit Platform + JUnit Jupiter + JUnit Vintage
JUnit5 建议使用 Java8 及以上版本
- JUnit Platform 是在 JVM 上启动测试框架的基础,它定义了
TestEngine在平台运行的新测试框架的 API - JUnit Jupiter 它用于编写测试代码的新的编程和扩展模型。它具有所有新的 Junit 注释和
TestEngine实现来运行这些注释编写的测试。 - JUnit Vintage JUnit4 已经存在了很长时间,并且有许多以 JUnit4 编写的测试。JUnit Jupiter 还需要支持这些测试。为此,开发了 JUnit Vintage 子项目。提供了一个测试引擎,用于在平台上运行基于 JUnit 3 和 JUnit 4 的测试。它要求 JUnit 4.12 或更高版本出现在类路径或模块路径中。从它的名字 Vintage(古老的;古色古香的)中也能有所体会。
简单例子
我们先来个最简单的例子,别看简单,很多人会犯错
1@SpringBootTest
2@RunWith(SpringRunner.class)
3public class JunitTest {
4    @Test
5    public void testJunit(){
6        System.out.println("junit test");
7    }
8}
很简单对吧,如果你用了 SpringBoot 简单到好像没啥说的,其实不然,我们来聊聊:
首先,这段代码使用的是 JUnit 4 还是 JUnit5 ? 你可能会觉得,4 和 5 没啥区别吧,用哪个不一样吗?代码能跑不就行了?
不是的,4 和 5 肯定有区别这个不用我说了。能跑没问题,但如果你不管是 4 还是 5 都认为一样,API 混用,甚至乱用,那这时候测试出现的各种报错,导致你很懵逼,而且不知道为什么,一通乱查也不知所然。
上面这段代码其实是 JUnit 4 版本,我们看一下 import 就一目了然了,然而可能你在开发的时候没太注意这里是 4 还是 5
1import org.junit.Test;
2import org.junit.runner.RunWith;
3import org.springframework.boot.test.context.SpringBootTest;
4import org.springframework.test.context.junit4.SpringRunner;
这里确定了,使用的是 4 的版本,这里有几个要注意的点:
@Test的包是org.junit.Test,不要搞错了,因为有好几个同名包- 需要
@RunWith(SpringRunner.class) - 测试类和测试方法需要
public修饰
我们看下完整的例子:
 1import org.junit.Test;
 2import org.junit.runner.RunWith;
 3import org.springframework.boot.test.context.SpringBootTest;
 4import org.springframework.test.context.junit4.SpringRunner;
 5
 6@SpringBootTest
 7@RunWith(SpringRunner.class)
 8public class JunitTest {
 9    @Test
10    public void testJunit(){
11        System.out.println("junit test ");
12    }
13}
这里强调下环境 ,springboot2.2.x 之前支持 JUnit 4
上面有一点提到了 需要 public 修饰的问题,这不很正常吗,为什么要强调?
那是因为 JUnit 5 不需要了,我们看一下用 JUnit 5 来实现的同样的例子 (SpringBoot 2.2.x 之后支持 JUnit 5):
 1import org.junit.jupiter.api.Test;
 2import org.springframework.boot.test.context.SpringBootTest;
 3
 4@SpringBootTest
 5class JunitTest {
 6    @Test
 7    void testJunit5(){
 8        System.out.println("junit5");
 9    }
10}
这么简单吗?对,就是这么简单,所以我说 4 和 5 不一样。我们来看区别的地方:
@Test的包是org.junit.jupiter.api.Test- 不需要
@RunWith(SpringRunner.class) - 测试类和测试方法不需要
public修饰
我见过很多同学在写测试用例时出现的所谓诡异问题,都是因为他自己都没搞清楚用的是 4 还是 5 的情况下将 4 和 5 混用导致的。
如果你的测试用例是 4 ,可以迁移到 5 了,有关 JUnit 4 迁移到 JUnit5 的话题可以参考这篇文章 ,通过工具可能节省很多时间:https://blog.jetbrains.com/idea/2020/08/migrating-from-junit-4-to-junit-5/
我们再来看一下 pom 依赖这里,你是不是经常看到有关 test 的依赖是这样写的:
 1<dependency>
 2    <groupId>org.springframework.boot</groupId>
 3    <artifactId>spring-boot-starter-test</artifactId>
 4    <scope>test</scope>
 5    <exclusions>
 6        <exclusion>
 7            <groupId>org.junit.vintage</groupId>
 8            <artifactId>junit-vintage-engine</artifactId>
 9        </exclusion>
10    </exclusions>
11</dependency>
为啥?为什么要排除 junit-vintage-engine ?如果你认真阅读了前文,你应该能猜到为什么了。
JUnit Vintage 是为了兼容 3 和 4 的一个 engine,如果我们的测试代码都用 5 实现,不需要兼容 3 和 4 ,那要它干嘛?当然是干掉呀,哈哈。
但如果你需要兼容,那请不要那么鲁莽。上面的这段 dependency 主要用于 spring-boot-starter-test 的 2.2.x 和 2.3.x 版本中。spring-boot-starter-test 2.4.x 版本中,已经不再包含 junit-vintage-engine 这个依赖项了
常规套路
| Annotations | 描述 |
|---|---|
@BeforeEach | 在方法上注解,在每个测试方法运行之前执行。 |
@AfterEach | 在方法上注解,在每个测试方法运行之后执行 |
@BeforeAll | 该注解方法会在所有测试方法之前运行,该方法必须是静态的。 |
@AfterAll | 该注解方法会在所有测试方法之后运行,该方法必须是静态的。 |
@Test | 用于将方法标记为测试方法 |
@DisplayName | 用于为测试类或测试方法提供任何自定义显示名称 |
@Disable | 用于禁用或忽略测试类或方法 |
@Nested | 用于创建嵌套测试类 |
@Tag | 用于测试发现或过滤的标签来标记测试方法或类 |
@TestFactory | 标记一种方法是动态测试的测试工场 |
常规套路不说了,比较简单,一看就明白,说几个有意思的。
重复性测试
1 @RepeatedTest(5)
2  void repeatTest(TestInfo testInfo,RepetitionInfo repetitionInfo){
3
4      System.out.println("repeat:" + testInfo.getDisplayName());
5      System.out.println("这是第 "+ repetitionInfo.getCurrentRepetition()+ "次重复");
6
7  }
不用自己写 for 循环了,人家自己带重复的注解,上面两个变量也是自己带的,方便拿到重复信息。
基于参数测试
1@ParameterizedTest
2@ValueSource(strings = {"java", "python", "go"})
3void containsChar(String candidate) {
4    assertTrue(candidate.contains("o"));
5}
如果你的参数少,也不用写循环了,直接写注解里,还挺方便的。
超时测试
1    @Test
2    @Timeout(value = 500, unit = TimeUnit.MILLISECONDS)
3    void failsIfExecutionTimeExceeds500Milliseconds() {
4        // fails if execution time exceeds 500 milliseconds
5    }
可以设置 超时的单位和时长
在 assert 中也可以测超时,可以这样写:
 1     // timed out after 5 seconds
 2    @Test
 3    void test_timeout_fail() {
 4        // assertTimeout(Duration.ofSeconds(5), () -> delaySecond(10)); // this will fail
 5
 6        assertTimeout(Duration.ofSeconds(5), () -> delaySecond(1)); // pass
 7    }
 8
 9    void delaySecond(int second) {
10        try {
11            TimeUnit.SECONDS.sleep(second);
12        } catch (InterruptedException e) {
13            e.printStackTrace();
14        }
15    }
并行测试
以上测试用例都是用主线程或者单线程跑的,下面我们玩儿个多线程并行 test
首先你要在你的 classpath 下面建一个文件 junit-platform.properties
接着加两行配置
1junit.jupiter.execution.parallel.enabled=true
2junit.jupiter.execution.parallel.mode.default=concurrent
行了,再跑你的用例就是多线程并行执行的了,当然如果用例本来就设计成单线程的看不出来,那可以使用 Repeat 试一下,比如上面讲过的这个:
1  @RepeatedTest(5)
2  void repeatTest(TestInfo testInfo,RepetitionInfo repetitionInfo){
3
4      System.out.println("repeat:" + testInfo.getDisplayName());
5      System.out.println("这是第 "+ repetitionInfo.getCurrentRepetition()+ "次重复");
6
7  }
上面这个是对一个方法的重复执行并行,有时候我们是想让一个类中的多个方法并行,能不能做到?可以,改下配置就好了
1junit.jupiter.execution.parallel.enabled = true
2junit.jupiter.execution.parallel.mode.default = concurrent
3junit.jupiter.execution.parallel.mode.classes.default = same_thread
如果反过来呢?多个类并行,类中的方法串行 也可以,还是改配置:
1junit.jupiter.execution.parallel.enabled = true
2junit.jupiter.execution.parallel.mode.default = same_thread
3junit.jupiter.execution.parallel.mode.classes.default = concurrent
MockMVC
你测个 service 测个 dao 很简单,把 Bean 注入就可以了,Controller 怎么测?我们要利用下 MockMVC 了
“
MockMvc 实现了对 Http 请求的模拟,能够直接使用网络的形式,转换到 Controller 的调用,这样可以使得测试速度快、不依赖网络环境,而且提供了一套验证的工具,这样可以使得请求的验证统一而且很方便。
”
我们先看一个简单的例子:
 1import org.junit.jupiter.api.*;
 2import org.springframework.beans.factory.annotation.Autowired;
 3import org.springframework.boot.test.autoconfigure.web.servlet.AutoConfigureMockMvc;
 4import org.springframework.boot.test.context.SpringBootTest;
 5import org.springframework.test.web.servlet.MockMvc;
 6import static org.hamcrest.Matchers.containsString;
 7import static org.junit.jupiter.api.Assertions.assertTrue;
 8import static org.springframework.test.web.servlet.request.MockMvcRequestBuilders.get;
 9import static org.springframework.test.web.servlet.result.MockMvcResultHandlers.print;
10import static org.springframework.test.web.servlet.result.MockMvcResultMatchers.content;
11import static org.springframework.test.web.servlet.result.MockMvcResultMatchers.status;
12
13@SpringBootTest
14@AutoConfigureMockMvc
15class HelloControllerTest {
16
17    @Autowired
18    private MockMvc mockMvc;
19
20    @Autowired
21    private HelloController helloController;
22
23    @Test
24    public void shouldReturnDefaultMessage() throws Exception {
25
26        this.mockMvc.perform(get("/hello"))
27                .andDo(print())
28                .andExpect(status().isOk())
29                .andExpect(content().string(containsString("Hello World")));
30    }
31 }
解释下没见过的注解:
@AutoConfigureMockMvc:用于自动配置 MockMvc, 配置后 MockMvc 类可以直接注入
此外我们利用 @Autowired 注入了一个 MockMvc 的 Bean 实例。我们通过这个例子来模拟请求 /hello 这个 Controller 资源,并且通过判断返回的 content 内容是否包含 Hello World 字符串来决定这个用例的执行是否成功。
注意 imports 部分,我们导入了 MockMvcRequestBuilders 的一些静态方法。整个方法就一行代码,解释一下:
- perform : 执行一个请求
- andDo : 添加一个结果处理器,表示要对结果做点什么事情,比如此处使用 print():输出整个响应结果信息
- andExpect : 添加执行完成后的断言
我们看下执行结果:
 1MockHttpServletRequest:
 2      HTTP Method = GET
 3      Request URI = /hello
 4       Parameters = {}
 5          Headers = []
 6             Body = null
 7    Session Attrs = {}
 8
 9Handler:
10             Type = com.xiaobox.springbootdemo.controller.HelloController
11           Method = com.xiaobox.springbootdemo.controller.HelloController#hello(String)
12
13Async:
14    Async started = false
15     Async result = null
16
17Resolved Exception:
18             Type = null
19
20ModelAndView:
21        View name = null
22             View = null
23            Model = null
24
25FlashMap:
26       Attributes = null
27
28MockHttpServletResponse:
29           Status = 200
30    Error message = null
31          Headers = [Content-Type:"text/plain;charset=UTF-8", Content-Length:"12"]
32     Content type = text/plain;charset=UTF-8
33             Body = Hello World!
34    Forwarded URL = null
35   Redirected URL = null
36          Cookies = []
我们来看下一个例子
 1
 2@WebMvcTest
 3class HelloControllerTest {
 4
 5    @Autowired
 6    private MockMvc mockMvc;
 7
 8    @Autowired
 9    private HelloController helloController;
10
11    @Test
12    public void shouldReturnDefaultMessage() throws Exception {
13
14        this.mockMvc.perform(get("/hello"))
15                .andDo(print())
16                .andExpect(status().isOk())
17                .andExpect(content().string(containsString("Hello World")));
18    }
19 }
你发现我们只是把 class 头上的注解换成了 @WebMvcTest,其实的没变,是的。但却比上一段代码快 3 倍。为什么?
因为之前的写法会把 Spring 完整的应用上下文全启动了,而 @WebMvcTest 是将测试范围缩小到仅启动 web 层,所以会快。当你只想测试 http 到 controller 这层的时候,可以用 @WebMvcTest 注解。
你甚至还可以告诉框架只启动某一个 controller 这样更快,比如:@WebMvcTest(HomeController.class)
上面是 WebMvcTest 的第一个场景, 我们来看第二个场景:也是测 controller ,但 controller 调用的 service 我们也 mock,不走真正 service 代码逻辑。这在有时你的 service 没准备好,或者不方便直接调用时会很有用。
 1@WebMvcTest
 2class HelloControllerTest {
 3
 4    @Autowired
 5    private MockMvc mockMvc;
 6
 7    @Autowired
 8    private HelloController helloController;
 9
10    @Test
11    public void greetingShouldReturnMessageFromService() throws Exception {
12
13        Mockito.when(service.greet()).thenReturn("Hello, Mock");
14
15        this.mockMvc.perform(get("/greeting")).andDo(print()).andExpect(status().isOk())
16                .andExpect(content().string(containsString("Hello, Mock")));
17    }
18
19 }
上面的代码我们用到了 Mockito, 可能你听过周杰伦一首新歌叫 Mojito ,对,Mockito 的命名就是对 Mojito(一种传统的古巴高球鸡尾酒)的戏称

简单来说 Mockito 是一个 java 做单元测试的 Mock 框架:https://site.mockito.org/
解释下我们上面这行代码 Mockito.when(service.greet()).thenReturn("Hello, Mock");
意为:当调用 service 的 greet 方法的时候,返回值为 “Hello Mock”,其实没真调那个方法,就是 Mock 了一下,直接给了个返回值。用英文说就是 :When the x method is called then return y
当然 Mockito 在假造上是很有实力的,它有丰富的 API 供你组合使用,有兴趣可以看一看文档和源码注释。
讲到这儿,一定有同学会问,只测 Controller ,那我就用 Postman 就行 了,甚至 curl 都行,为啥要写用例,我不写用例。
哈哈,我相信很多后端同学都没认认真真把用例写完,尤其是 controller 这层的,不装逼,我也是。那我们有必要讨论一下 到底是用 Postman 还是用 MockMVC ?
首先说说 MockMVC 的好处:
- 可编程,这就给了你无限的自由空间,想怎么折腾随便你,你是上帝
- 除了写的时候花点时间外,调试的时候速度快,而且可配置,你要想只测 controller,就只启动 controller 的上下文就行了
- 顺便把测试用例写了,测试同学省心了,给自动化测试提供了基础
- 间接提高代码质量
其他的我不说,我就说最后一点。我注意到一个现象,很多开发同学拿测试同学当工具人,自己写的代码自己不怎么测试,直接交给测试让他们提 BUG,然后改,BUG 多也不觉得害臊。开发是爽了,由于代码质量差,整个项目的进度都被拖慢了。你可能会说这是软件质量管理的问题,是规则制定的有问题,如果出 BUG 扣钱就没这事儿了。
我要说的是,在软件开发这个领域,很多事情不是刻板的死规则,即便是制定了这样的规则,也不一定有效。更多的时候是整个团队的文化和风气,领导者有责任将整个研发团队的文化和风气带向正轨。什么是正轨 ?其实我们都知道!我们都知道应该写高质量的代码,bug 少的代码,设计合理的代码,不断重构、不断维护的代码,我们都知道要做好自己的事就会提高整个团队的效率,我们都知道应该写注释、写文档,我们都知道…..
我们都知道,但我们也知道项目时间紧,而且专门有人一遍遍强调 deadLine ,有人关心你的开发进度,关心功能实现了没有,关心老板有没有意见,没有人关心你累不累,关心你几点下的班,关心规划合不合理,关心代码质量高不高,关心与软件真正有关系的一切。所以做一个真正的 软件研发团队的 Leader 不容易,遇到好 Leader 是你的福气。
扯多了,我们回头来看 Postman ,Postman 的好处好像也不用我多说了,确实,如果只是简单的做 Controller 连通测试,用 Postman 一点儿问题没有,也比写程序快,但如果你的需求时有正好是 MockMVC 的优点可以覆盖的地方,那么就动动手,写写程序吧。
测试报告
想成一份漂亮的测试报告 ?后端同学说了,整那花里胡哨的有啥用呢,简单一点儿不好吗?
好,简单点儿当然可以,但 UI 带给我们的价值不就是一图胜千言嘛,让无论是前端、后端、测试同学都能一目了然,减轻大脑处理信息的成本。
来,我们先上成果
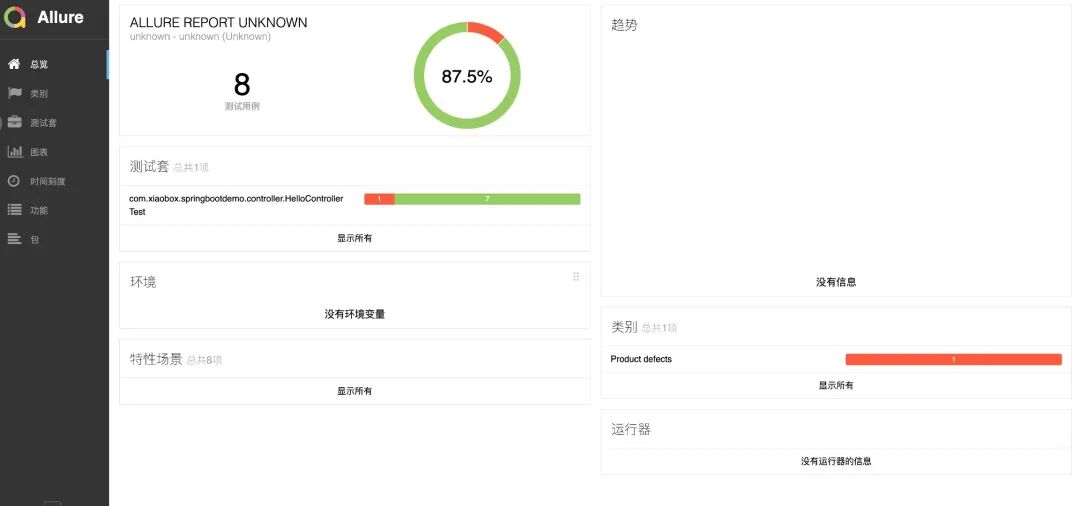
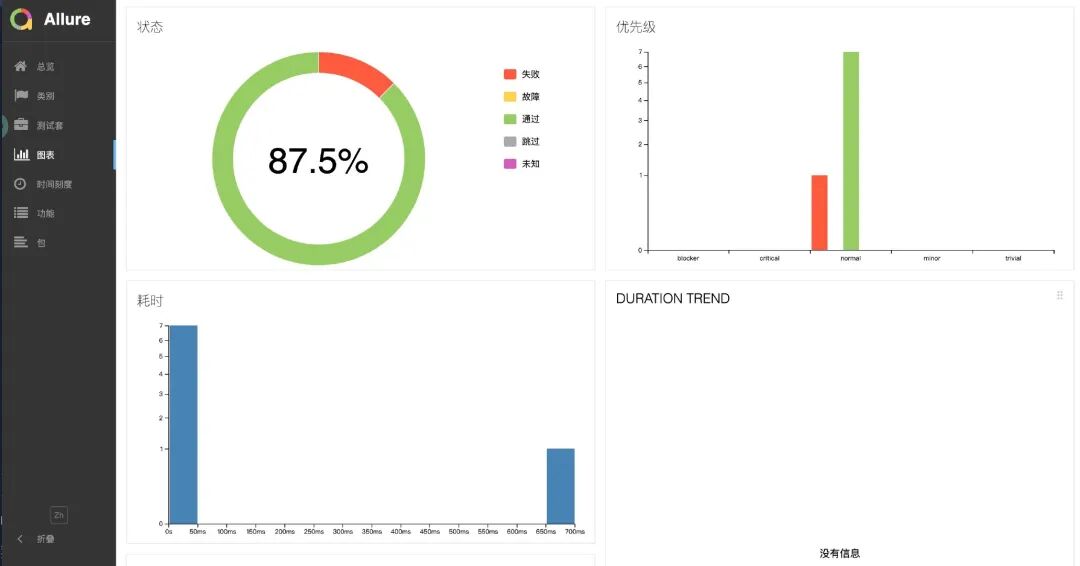
怎么样,还挺好看的吧,我们用的是 Allure 来生成了一个 web 页面,这个页面还有一些简单的交互,整体简洁好看、易用。
下面我们说一下 Allure 怎么和 JUnit 集成的
我们仍然使用 SpringBoot 以及 JUnit 5 ,先修改一下 pom.xml 文件,添加依赖
 1 <dependency>
 2    <groupId>org.springframework.boot</groupId>
 3    <artifactId>spring-boot-starter-test</artifactId>
 4    <scope>test</scope>
 5    <exclusions>
 6        <exclusion>
 7            <groupId>org.junit.vintage</groupId>
 8            <artifactId>junit-vintage-engine</artifactId>
 9        </exclusion>
10    </exclusions>
11</dependency>
12 <!--测试报告 allure -->
13  <dependency>
14      <groupId>io.qameta.allure</groupId>
15      <artifactId>allure-junit5</artifactId>
16      <version>2.18.1</version>
17      <scope>test</scope>
18  </dependency>
然而我们添加在 build 中两个 plugin
 1    <plugin>
 2        <artifactId>maven-surefire-plugin</artifactId>
 3        <version>2.21.0</version>
 4        <configuration>
 5            <testFailureIgnore>false</testFailureIgnore>
 6            <argLine>
 7                -javaagent:"${settings.localRepository}/org/aspectj/aspectjweaver/${aspectj.version}/aspectjweaver-${aspectj.version}.jar"
 8            </argLine>
 9            <systemProperties>
10                <property>
11                    <name>junit.jupiter.extensions.autodetection.enabled</name>
12                    <value>true</value>
13                </property>
14            </systemProperties>
15        </configuration>
16        <dependencies>
17            <dependency>
18                <groupId>org.junit.platform</groupId>
19                <artifactId>junit-platform-surefire-provider</artifactId>
20                <version>1.2.0</version>
21            </dependency>
22            <dependency>
23                <groupId>org.aspectj</groupId>
24                <artifactId>aspectjweaver</artifactId>
25                <version>${aspectj.version}</version>
26            </dependency>
27        </dependencies>
28
29    </plugin>
30    <plugin>
31        <groupId>io.qameta.allure</groupId>
32        <artifactId>allure-maven</artifactId>
33        <version>2.11.2</version>
34        <configuration>
35            <reportVersion>2.4.1</reportVersion>
36        </configuration>
37    </plugin>
我们用 brew 在本地安装一下 Allure (我是 mac 就用这个装了,如果你是其他环境参考后面说的文档)
1brew install allure
接着我们调整项目中的测试用例,然后执行:
1mvn clean test
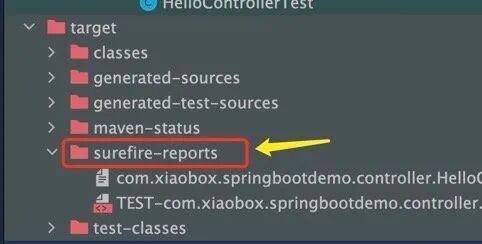
接着找到你项目中 surefire-reports 的目录位置
然后执行类似如下命令:
1# 注意路径改成你自己项目的,这里只是示例
2allure serve /home/path/to/project/target/surefire-reports/
显示如下信息会自动跳转到浏览器,打开测试报告页面。
 是不是很简单?
有关 Allure 安装和使用说明请参考:https://docs.qameta.io/allure-report
有关 JUnit5 就聊到这儿,日常一般的开发是够用了。更多的细节和功能,绍假设 、 断言等,请看官方文档 ,当然备不注它也有错的时候。
TestNG
TestNG is a testing framework inspired from JUnit and NUnit but introducing some new functionalities that make it more powerful and easier to use, such as:
- Annotations.
- Run your tests in arbitrarily big thread pools with various policies available (all methods in their own thread, one thread per test class, etc…).
- Test that your code is multithread safe.
- Flexible test configuration.
- Support for data-driven testing (with @DataProvider).
- Support for parameters.
- Powerful execution model (no more TestSuite).
- Supported by a variety of tools and plug-ins (Eclipse, IDEA, Maven, etc…).
- Embeds BeanShell for further flexibility.
- Default JDK functions for runtime and logging (no dependencies).
- Dependent methods for application server testing.
上面是 TestNG 的官方介绍,看起来比 JUnit 功能还强大。有了前面 Junit 作为引子, 你再看 TestNG,就好理解的多,因为概念上都差不多,只是功能和细节的不同而已。在这里我们不会展开讲 TestNG 了,但是会讨论一下选型的问题。
如果在 JUnit 5 没出来之前,比如 JUnit4 和 3 的时代,我会毫不犹豫地选择 TestNG,为什么?功能强大,好用啊。但是现在 JUnit5 来了,而且推广的势头也很猛,重要的是从功能上也不输 TestNG,那么怎么选呢?
个人觉得:
- 如果是后端开发,一般还是选 JUnit 5 写单元测试方便简单些,SpringBoot 也内置了 JUnit 开箱即用,从生态和社区上讲即使有坑也好解决些
- 如果是搞自动化测试的同学,更多的可能还是用 TestNG 方便些,之前很多遗留项目都是用的 TestNG,另外它和自动化测试工具 selenium 的搭配也早已深入人心。从设计理念到 API,都更符合测试同学的思维。
参考
- https://testng.org/doc/
- https://spring.io/guides/gs/testing-web/
- https://cloud.tencent.com/developer/article/1779117
- https://blog.csdn.net/qq_39466683/article/details/121911310
- https://tonydeng.github.io/2017/10/10/junit-5-annotations/
- https://junit.org/junit5/docs/current/user-guide/
- https://www.liujiajia.me/2021/5/14/why-exclude-junit-vintage-engine-by-default